Installing a Windows or Linux VM
The VMs page of the Maximizer Host web UI lets you create Windows or Linux virtual machines with full GPU passthrough — no command line required. Only Step 1 (installing/updating the Maximizer Host package) is done in console mode; everything after that is done from your browser and the Maximizer client. The same steps apply to Windows and Linux; OS-specific notes are called out where they differ.
Step 1 — Install the new Maximizer Host and reboot (console mode)
The VM feature requires the latest Maximizer Host package (v1.0.248 or newer) installed on the bare-metal system itself. This step must be done in console mode — using the WebUI console feature in your online control panel, not during a streaming session — because the installer restarts the streaming service and a reboot of the host is required afterwards.
- Download the latest Maximizer Host .deb (Ubuntu 24.04 / Linux Mint 22+) and copy it onto the host: Maximizer-Host.v1.0.248.for.Linux.Ubuntu.24.04.deb
- Install it — you can simply double-click the .deb in the console and use the graphical installer, no terminal required. (If you prefer the terminal, run
sudo apt install ./Maximizer-Host*.deb.) Either way, KVM, QEMU, libvirt and Virt-Manager are pulled in automatically as package dependencies — nothing else to install. - Shut the host down:
sudo shutdown nowThen wait 6 minutes and power the host back on.
Once the host is back up, start in Gaming mode — from Step 2 onward everything is done there (streamed from the Maximizer client); the rest of this guide is just the host's web UI and the Maximizer client.
Step 2 — Check system readiness
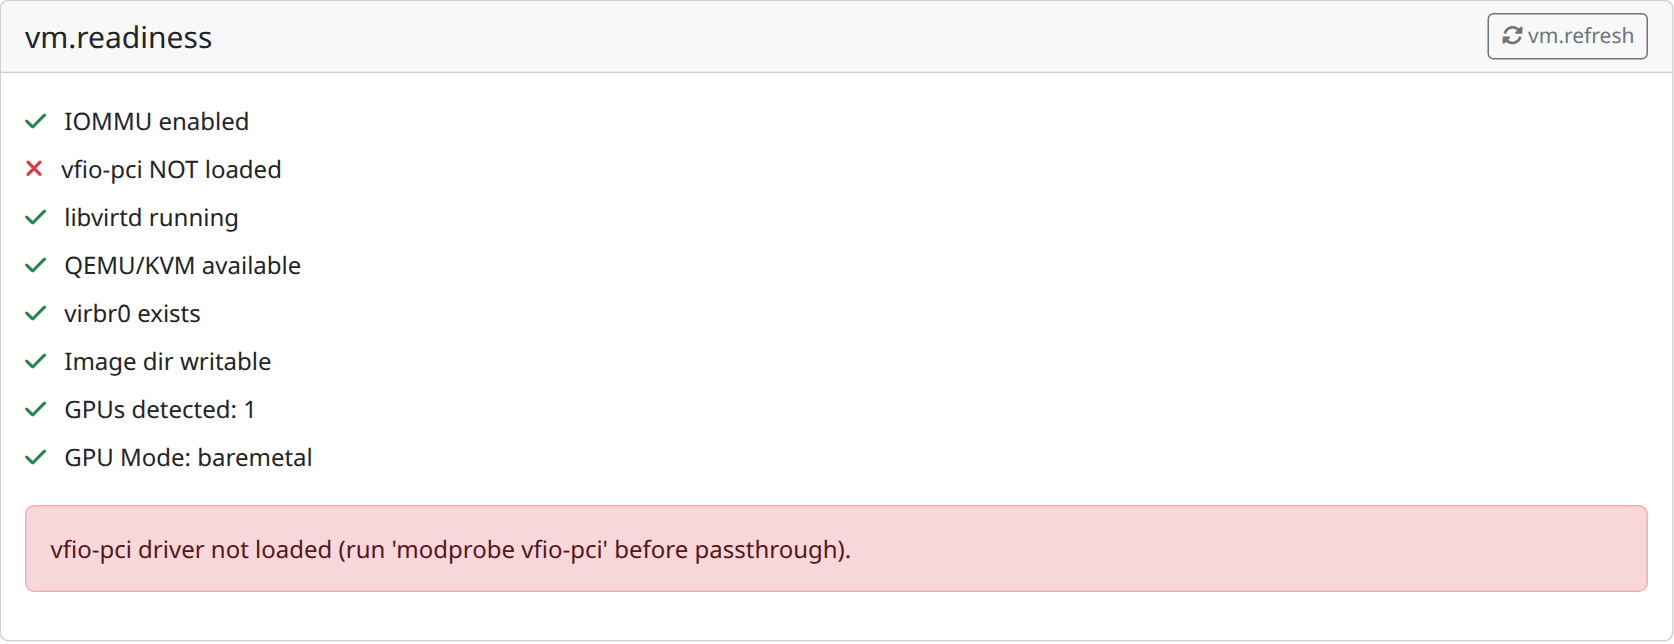
From here on, everything is done from your browser at https://<your-host-ip>:47990/vms — log in with your host's web UI username and password. Open the VMs page and scroll to the Readiness section. The key checks should be green: IOMMU enabled, libvirtd running, QEMU/KVM available, the virbr0 network bridge present, the image directory writable, plus OVMF (UEFI firmware) and vTPM available (added in v1.0.244). It's normal for vfio-pci to show as not loaded while the GPU is in Bare Metal mode — the driver is bound automatically when a VM starts (see Step 8).
Step 3 — Upload the installation ISO
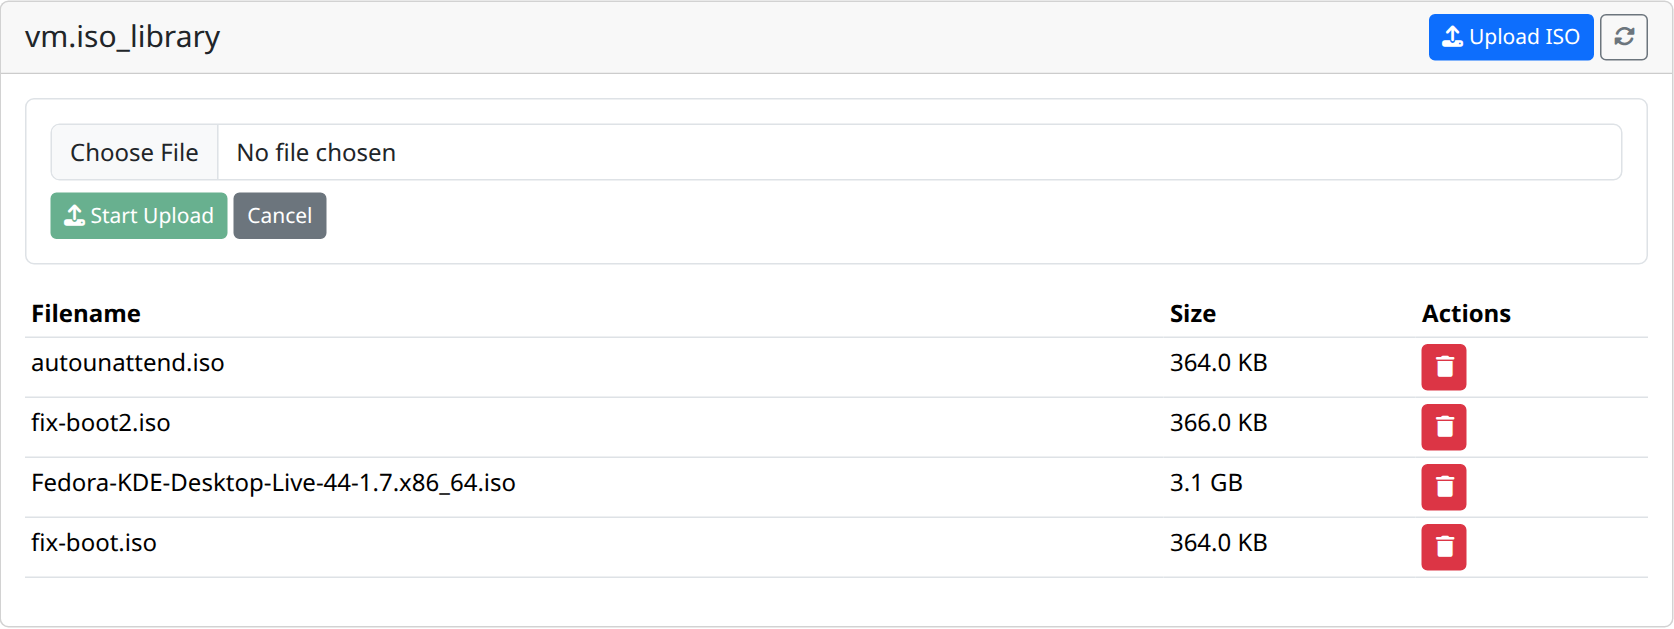
In the ISO Library section, click Upload ISO, choose your .iso (or .img) file and click Start Upload. Wait for the progress bar to reach 100% — large ISOs can take a while. The file then appears in the library table.
Step 4 — Create the VM
Click Create VM in the Virtual Machines section. The wizard has three steps:
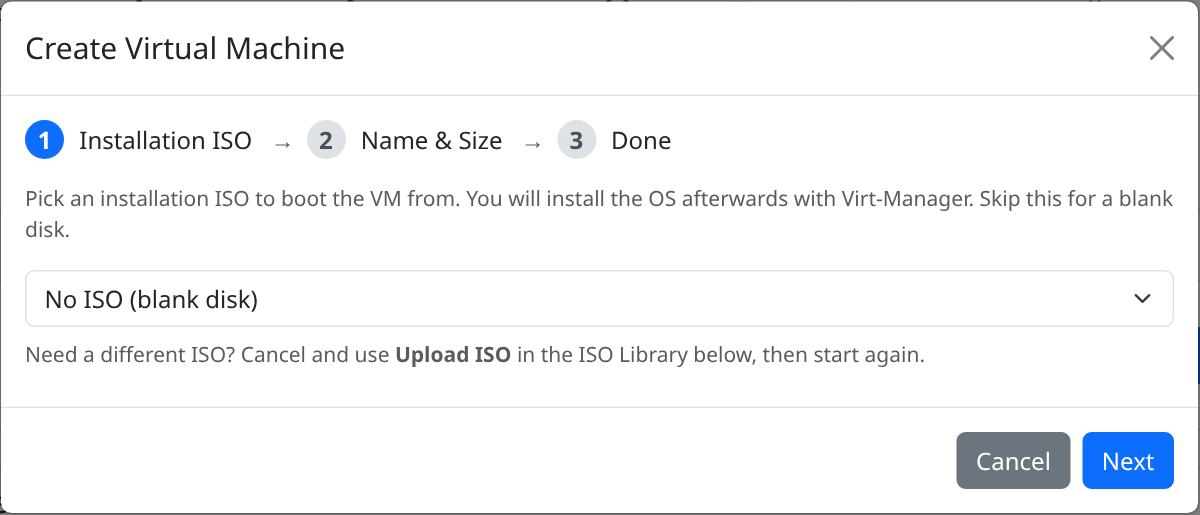
- Installation ISO — select the ISO you just uploaded (or choose No ISO for a blank disk) and click Next.
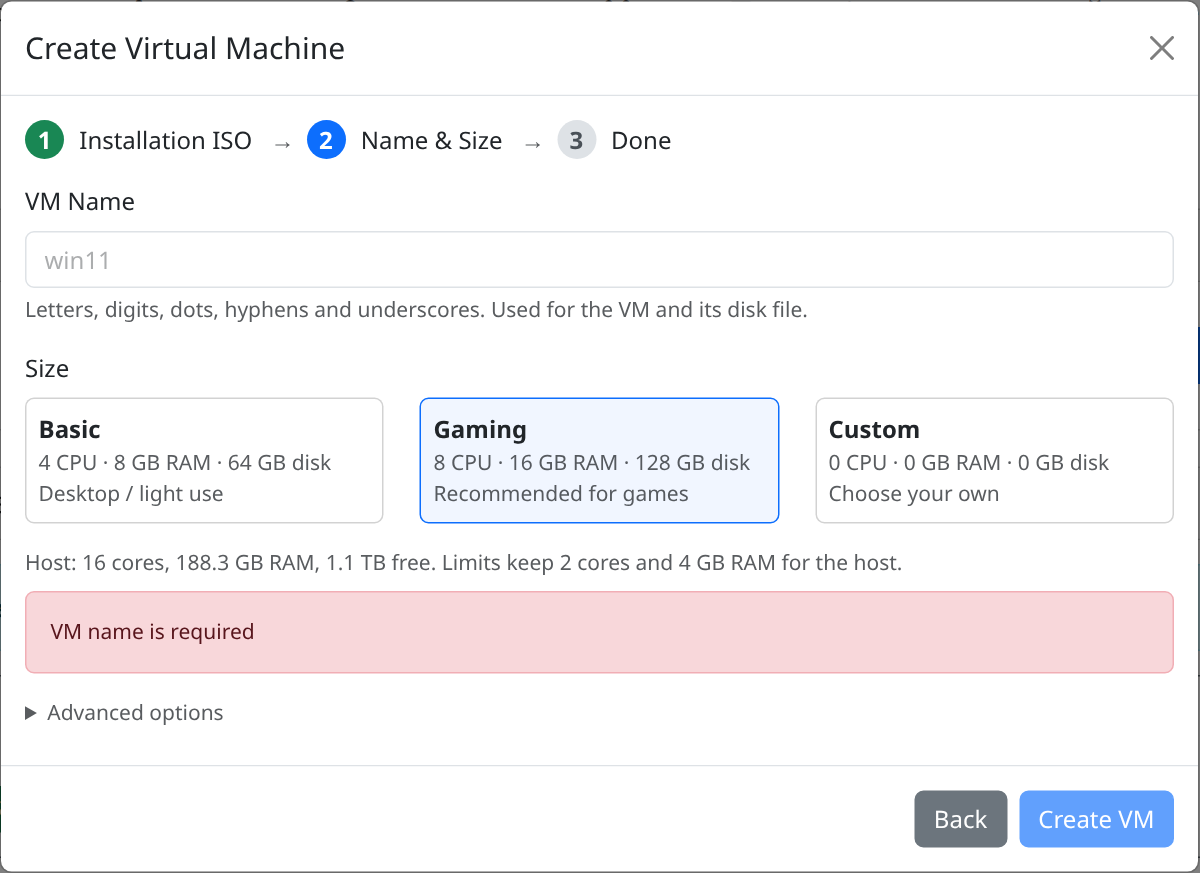
- Name & Size — enter a VM name (letters, digits, dots, hyphens and underscores; it is also used for the disk file) and pick a size: Basic (4 CPU · 8 GB RAM · 64 GB disk) for desktop/light use, Gaming (8 CPU · 16 GB RAM · 128 GB disk, recommended for games), or Custom. The wizard enforces limits so the host always keeps enough CPU cores and RAM for itself. Under Advanced options you can enable auto-restore of a clean snapshot before each start — leave this off for a normal install, since it discards all changes made inside the VM. You can also turn off Secure Boot there (host package v1.0.248 and newer): leave it on for Windows and for most Linux distros — Ubuntu, Fedora and other mainstream ISOs boot fine with it — and turn it off only for niche Linux ISOs with unsigned bootloaders. Secure Boot cannot be changed after the VM is created.
- Done — click Create VM. The VM is created and started automatically, and the wizard shows a one-time trust token for this VM. Keep it as a fallback — registration is automatic (Step 7), so you only need the token if a VM somehow doesn't register on its own. (If you close the wizard, you can generate a new token later in the Guest Pairing section.)
Note: host package v1.0.244 and newer creates VMs with UEFI firmware (OVMF) and a virtual TPM 2.0; v1.0.247 and newer adds Secure Boot (Microsoft keys enrolled) — Windows 11-ready out of the box, and UEFI is required for hosts with the Radeon AI PRO R9700 (RDNA4), whose VBIOS only works in UEFI mode. VMs created by older host packages used legacy SeaBIOS boot; on an R9700 host those must be recreated (or converted with MBR2GPT) before the GPU will produce video.
Step 5 — Open the console and install the OS
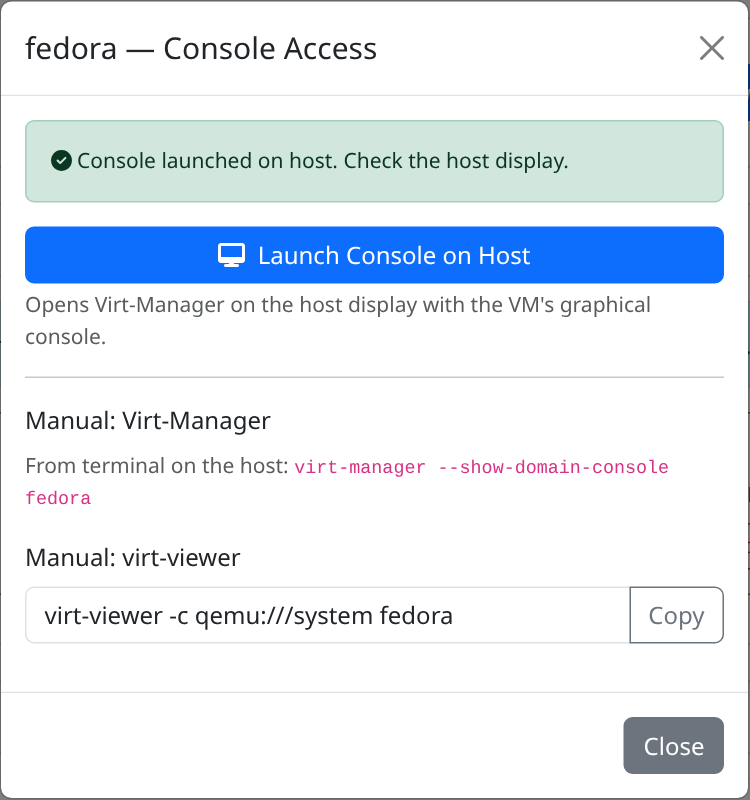
The new VM now appears in the Virtual Machines list with status running, booting from your ISO. Click Console next to it (or Open Console in the wizard's Done step) and then Launch Console on Host — this opens the VM's graphical console in Virt-Manager on the host display.
- Windows: walk through the Windows setup as usual. The virtual disk uses a standard SATA controller, so the installer sees it without any extra drivers.
- Linux: run through your distro's installer (e.g. Ubuntu's) and install to the virtual disk.
Advanced users can also connect from a terminal on the host with virt-manager --connect qemu:///system --show-domain-console <vm-name> or virt-viewer -c qemu:///system <vm-name>, or via VNC at the address shown in the console dialog (VNC listens on the host's localhost only — connect from the host itself or through an SSH tunnel).
Step 6 — Install Maximizer Sunshine inside the VM
Once the OS is installed and you're at its desktop, install the streaming software inside the guest:
- Windows: download and run the Maximizer Host installer inside the VM: Maximizer-Host.v1.0.248.for.Windows.exe
- Linux: install the Maximizer Host package for your distro.
Then restart the VM (Start Menu → Power → Restart) so the Sunshine service and the display driver come up cleanly. The host discovers the guest automatically within about 30 seconds of it booting. (The guest's Sunshine Web UI is pre-configured with the default username admin and password admin — you can change these later from its Web UI inside the VM.)
Step 7 — Register the guest with the host (automatic)
Good news first: no pairing is needed for the VM to show up. As long as your Maximizer client is paired with the bare-metal host, every VM you create appears in the client's app list automatically as soon as it's created.
Registration is fully automatic: once Maximizer Sunshine is installed and running inside the VM (Step 6), the host detects it on the VM network within about 30 seconds and registers it — no tokens, no manual steps. This works for fresh installs from a standard Windows or Linux ISO as well as prebuilt images, and it also re-runs automatically after every host reboot or update.
Fallback (only if a VM somehow doesn't register): open the Sunshine web UI inside the VM and enter Host IP 192.168.122.1 (the VM's default gateway), port 47990, and a trust token from the Guest Pairing section on the host's VMs page (click Generate New Token).

Step 8 — Start the VM from the Maximizer client
Prerequisite: make sure you have the latest version of the Maximizer client (v1.0.243) installed on your device — VM start and the automatic GPU switch are only available in the new build. Download it for your device:
- Windows: Maximizer-Client-1.0.243-Setup.exe
- Linux (Ubuntu 24.04 / Linux Mint 22+): Maximizer-Client-1.0.243-Ubuntu24.04-amd64.deb
Note: only the Linux version of the Maximizer client supports WebGPU.
Here's the convenient part: you never need to switch the GPU mode yourself. When you start the VM from the Maximizer client, it automatically switches the GPU to passthrough mode for you — no restart needed: the graphics card is handed to the VM live (your bare-metal session ends and the host's display goes dark), the VM boots, and you're connected within a couple of minutes. The full power-cycle with a ~6-minute GPU hardware reset is only needed when switching back to bare-metal gaming later — the client guides you through that too.

To go back to bare-metal gaming later, just launch a regular host app from the Maximizer client — it switches the GPU back to Bare Metal (amdgpu) automatically through the same guided restart.
Step 9 — Install the GPU driver inside the VM (Windows)
The first time the VM starts with GPU passthrough, Windows detects the graphics card as a Microsoft Basic Display Adapter — that's expected: the card is fully passed through, but Windows doesn't have its driver yet. Inside the streamed session, download and install the AMD Adrenalin drivers for your GPU from amd.com/en/support. The installer detects the card normally, since the passed-through GPU appears as a real device inside the VM. (The Maximizer installer already set up the Virtual Display Driver, which provides the streamed desktop; the AMD driver is what renders games and hardware-encodes the video stream.)
Tip: use the full "AMD Software: Adrenalin Edition" package from your GPU's support page (the large ~800 MB download), not the small web installer: the full package skips the VM-incompatible chipset stage on its own and installs the display driver in one pass. If you do use the small web installer and it appears to sit at ~64%, that's the optional AMD Chipset Software (not needed in a VM) — guest package v1.0.242+ clears it automatically, or end Chipset.exe in Task Manager; the display driver install then continues. Restart the VM once after installing so the driver binds.
Linux guests: nothing to do — the open-source AMDGPU driver is built into the kernel and works with the passed-through GPU out of the box.
Managing your VMs
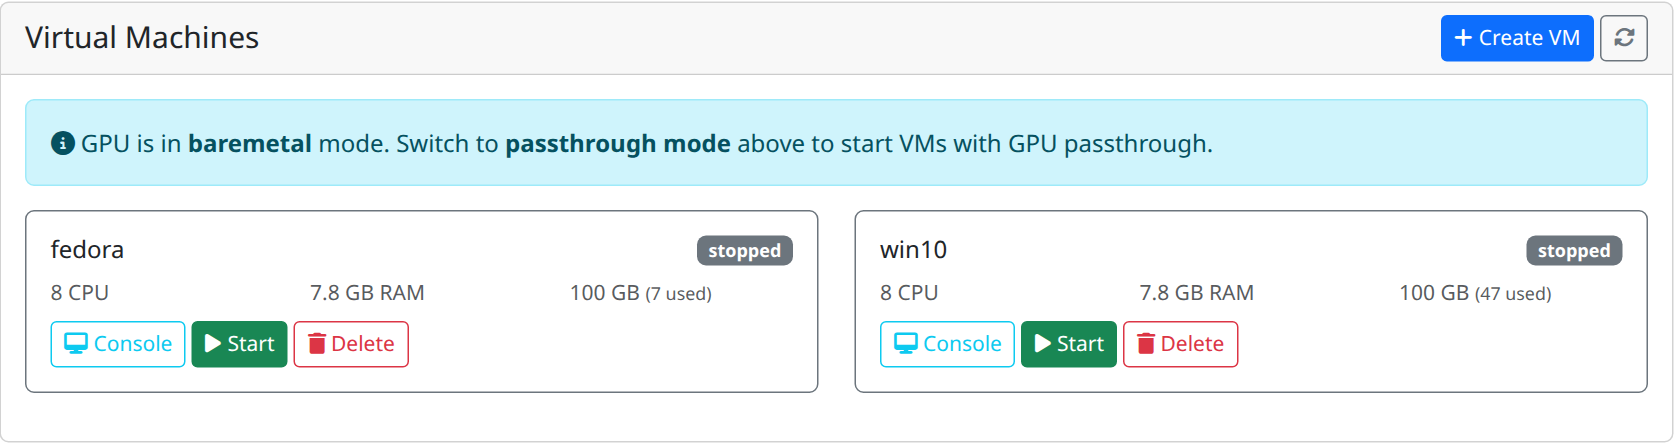
Each VM in the list has Start, Stop (graceful shutdown), Force Stop (power off) and Delete buttons. Deleting can optionally wipe the virtual disk — recommended, since it removes all data inside the VM. If you enabled the auto-restore snapshot option, every start rolls the VM back to its clean snapshot.
Troubleshooting
- GPU needs a cold reboot — if Diagnostics reports the GPU is in an unrecoverable state, shut the host down completely (from inside the OS if you can, otherwise from your online control panel), wait the full 6 minutes for the GPU to discharge, then power it back on. The GPU returns to normal on the next boot.
- VM created but not started — start it manually from the VM list with the Start button.
- vfio-pci not loaded in Readiness — normal while the GPU is in Bare Metal mode; the driver is bound automatically when you start the VM from the Maximizer client.
- VM has no network/IP — make sure the virbr0 readiness check is green; VMs get their network from that bridge.
- Windows VM is booted but the client says the VM is "not running or unreachable" — the VM is running, but the streaming service inside it isn't answering. On host packages from v1.0.236 the guest configures itself automatically; on older installs, Sunshine stays in first-run mode and listens on localhost only until you open its Web UI inside the VM (
https://localhost:47990) and set a username and password. Also make sure the host is on v1.0.233 or newer, which discovers guests automatically within about 30 seconds. - Error 409 ("GPU is not available/assigned") — the VM is running, but the GPU wasn't given to it. The GPU is only passed through when the VM is started from the Maximizer client. Stop the VM, then start it from the client — no host restart is needed; the card is handed over live.
- Error 503 ("VM is not running or unreachable") right after starting the VM — the VM's OS is still booting and its Sunshine hasn't registered with the host yet. The VM can show as "started" before it's actually streamable; wait 1–2 minutes and try again (about 30 seconds on v1.0.233+).
- VM shows in the client but won't connect right after a host reboot or update — the host rediscovers the VM's Sunshine automatically within about 30 seconds (v1.0.233+); just wait a moment and refresh the app list. If it still won't connect after a minute, stop and start the VM again.
- GPU shows as "Microsoft Basic Display Adapter" in the VM — normal on the first passthrough start; install the AMD drivers (Step 9). If no AMD card appears in Device Manager at all, or it shows an error such as Code 43, stop the VM, shut the host down completely (a cold boot — not a restart), and start the VM again; the GPU ROM used for passthrough is captured once at host boot.
- AMD driver installer appears stuck around 64% inside the VM — that pause is the optional AMD Chipset Software package: it checks for a physical AMD chipset motherboard, which a VM does not have, so its sub-installer just sits there. It does not block the graphics driver. Guest packages v1.0.242 and newer handle this automatically (the in-guest Maximizer service skips the chipset stage and ends any stuck
Chipset.exefor you). On an older guest package: open Task Manager inside the VM (Ctrl+Shift+Esc → Details), endChipset.exe, and the installer continues. Either way, restart the VM once afterwards so the driver binds; the streaming service then picks up hardware video encoding automatically. - "No video received from host" when streaming a VM — the handshake works but no picture arrives. Fixed in host package v1.0.243 and newer: the host now validates the GPU's VBIOS image it captures at boot (a rare corrupt capture made the guest detect the wrong card — e.g. an "AI PRO R9700" on a 7900 XTX host — and broke video). On older hosts: reboot the host (the VBIOS is recaptured at boot) and start the VM again. On a Radeon AI PRO R9700 host there is a second cause with the same symptom: the R9700 VBIOS is UEFI-only, so VMs created by host packages older than v1.0.244 (legacy SeaBIOS boot) never initialize the card — update the host package and recreate the VM.
- GPU Mode shows "unknown" — the GPU driver was not detected; reboot the host.
- Linux ISO stops on a blue "Security Violation" / "Secure Boot forbids booting" screen — the ISO's bootloader isn't signed for Secure Boot. Recreate the VM and turn off Secure Boot under Advanced options in the Create VM wizard (host package v1.0.248 and newer). For most Linux distros — Ubuntu, Fedora and other mainstream ISOs — leave Secure Boot on; they boot fine with it. Windows VMs should always keep it on (Windows 11 requires it).