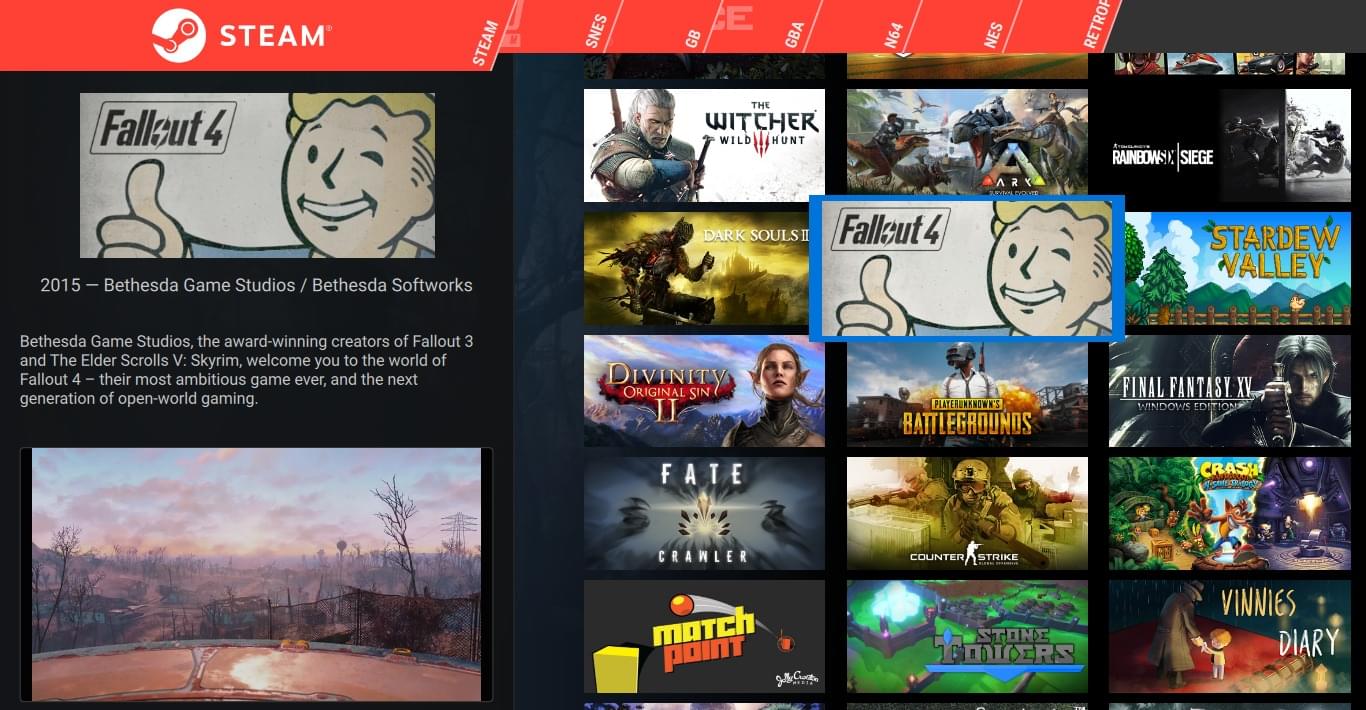
SteamEpic GamesGOGUbisoft ConnectEA appItch.ioAnd More
The bare metal advantage
Why settle for virtual when you can have the real deal?
No virtualization, just raw power. Get direct, hardware-level access to a dedicated physical machine's CPU, GPU, and RAM—exactly as the silicon intended. Only on the Bare Metal plan.
Maximum Settings
Bare metal
Games run directly on physical hardware
Full, exclusive access to CPU, GPU & RAM
No hypervisor tax — every frame counts
Lower latency, smoother frame pacing
Two customers never share the same resources
Install an operating system of your choice Linux Mint is the default OS, running on bare metal for maximum performance. You can also bring your own OS and run it in VM mode, which may introduce a small performance overhead. Custom operating systems must be installed manually, and you must provide your own ISO files and any required licences. You can install multiple operating systems and switch back to Linux Mint on bare metal with a single reboot.
Standard VM plan
Extra software layers between the game and hardware
Hypervisor overhead consumes processing power
Inconsistent performance and frame pacing under load
Frequently blocked by kernel-level anti-cheats
No custom OS installs — Linux Mint only
Simple monthly pricing
Pick your rig.
Choose Bare Metal for dedicated physical hardware. Every plan includes daily gaming hours, with extra time available at the rates below.
Virtualized · 1080p gaming
Starter
AMD RX 580 · Ryzen 1400
$9.95 CAD/mo
≈ $7.25 USD/mo*
2 hrs peak + 4 hrs off-peak daily
Peak: 5 PM–12 AM · Off-peak: 12 AM–5 PM (ET). Extra time on this plan costs $0.35 CAD per hour.
…there isn't another cloud service that can touch this one from a value for performance and flexibility metric. I've used Stadia, GFN, Shadow PC, Xcloud and Boosteroid and for the time being MXS would be my recommendation to someone who asked.
— FusilliCraig · Discord
“
Just wanted to say thank you, not in a financial position to spend 2.5k but can spare some money for a system like this; was initially really worried about latency on Star Citizen, I can say 100% I am satisfied
— Perchant · Discord
“
I give MXS a 10/10 and would recommend this service to any of my friends/family or anyone else interested!
— Juandi · Discord
Flagship hardware — Bare Metal plan
Serious hardware, for serious gamers.
Authentic enthusiast-grade components in every rig, housed in Thermaltake open cases at our privately owned facility. We never colocate.
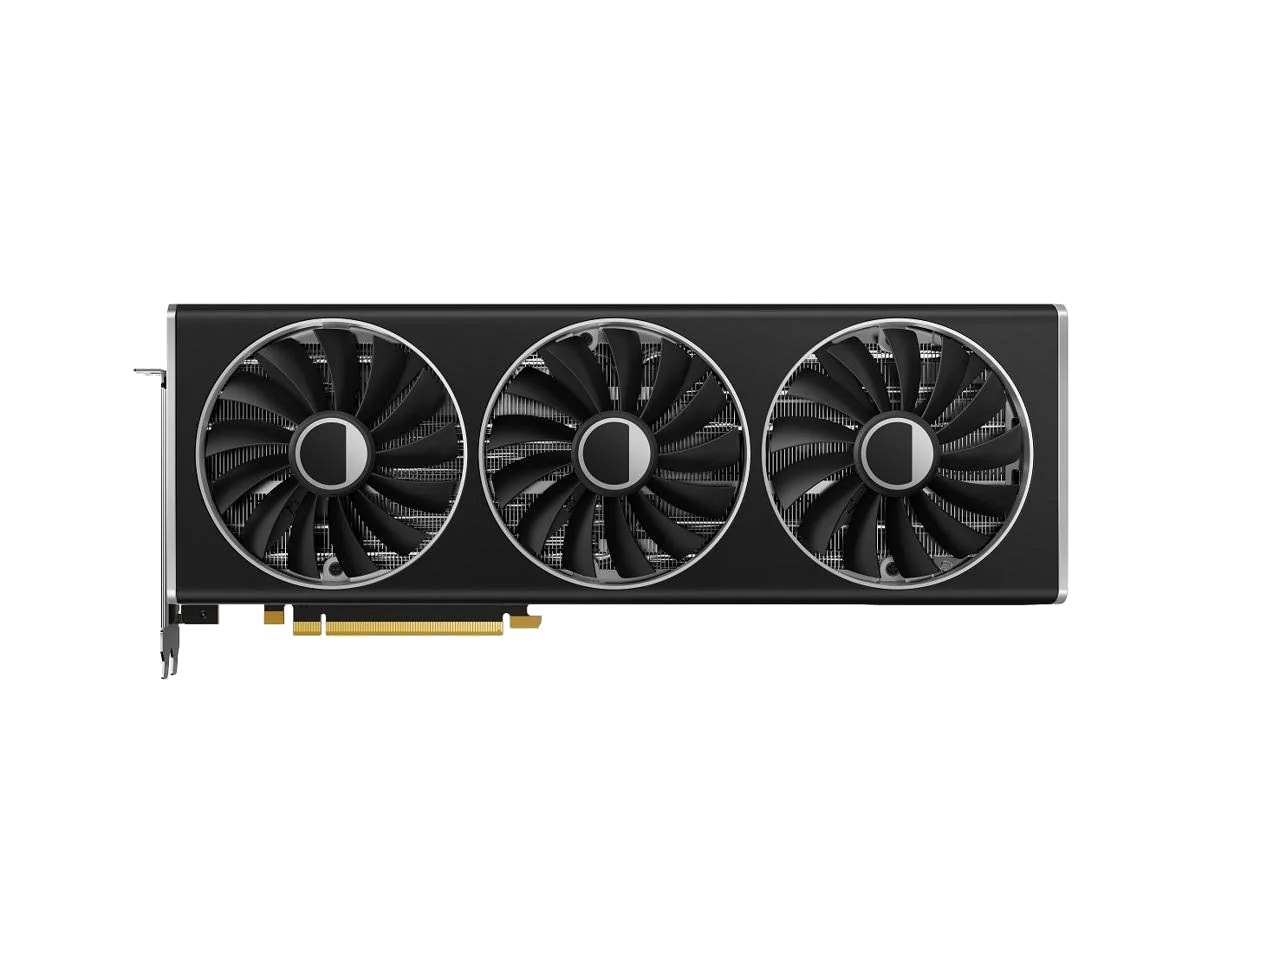
GraphicsAMD Radeon RX 7900 XTX
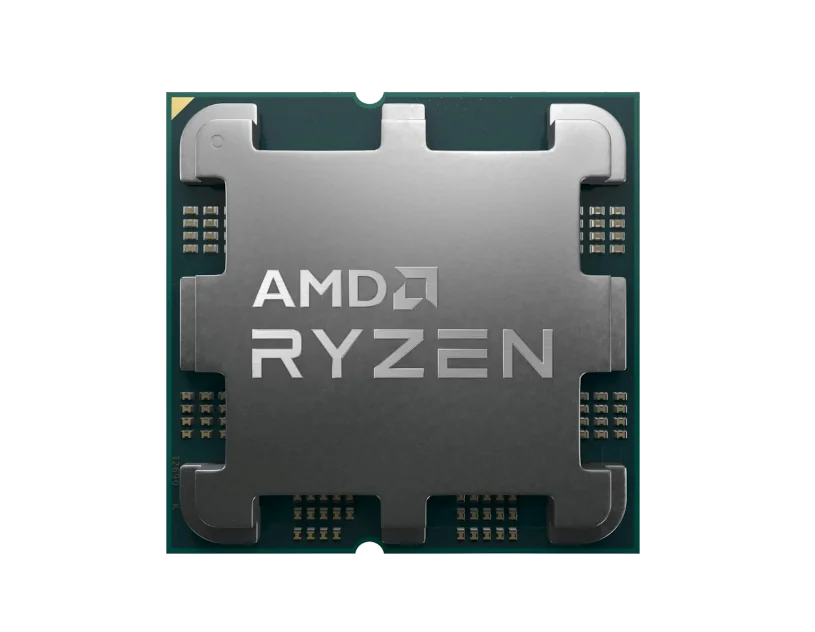
ProcessorAMD Ryzen 9 7800X3D / 7900X3D
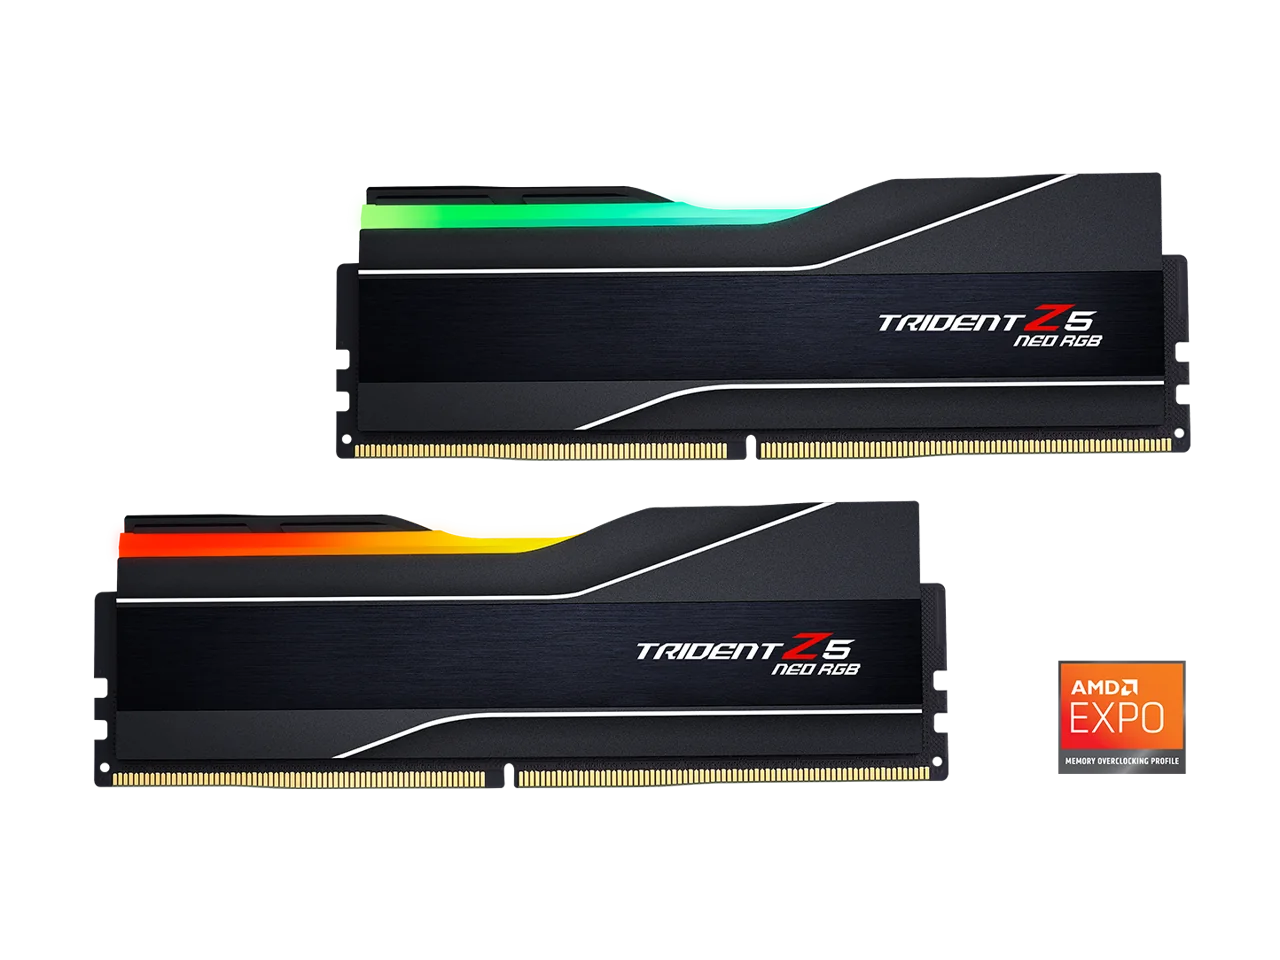
MemoryDDR5 · G.SKILL Trident Z5 Neo
CoolingNoctua CPU cooler
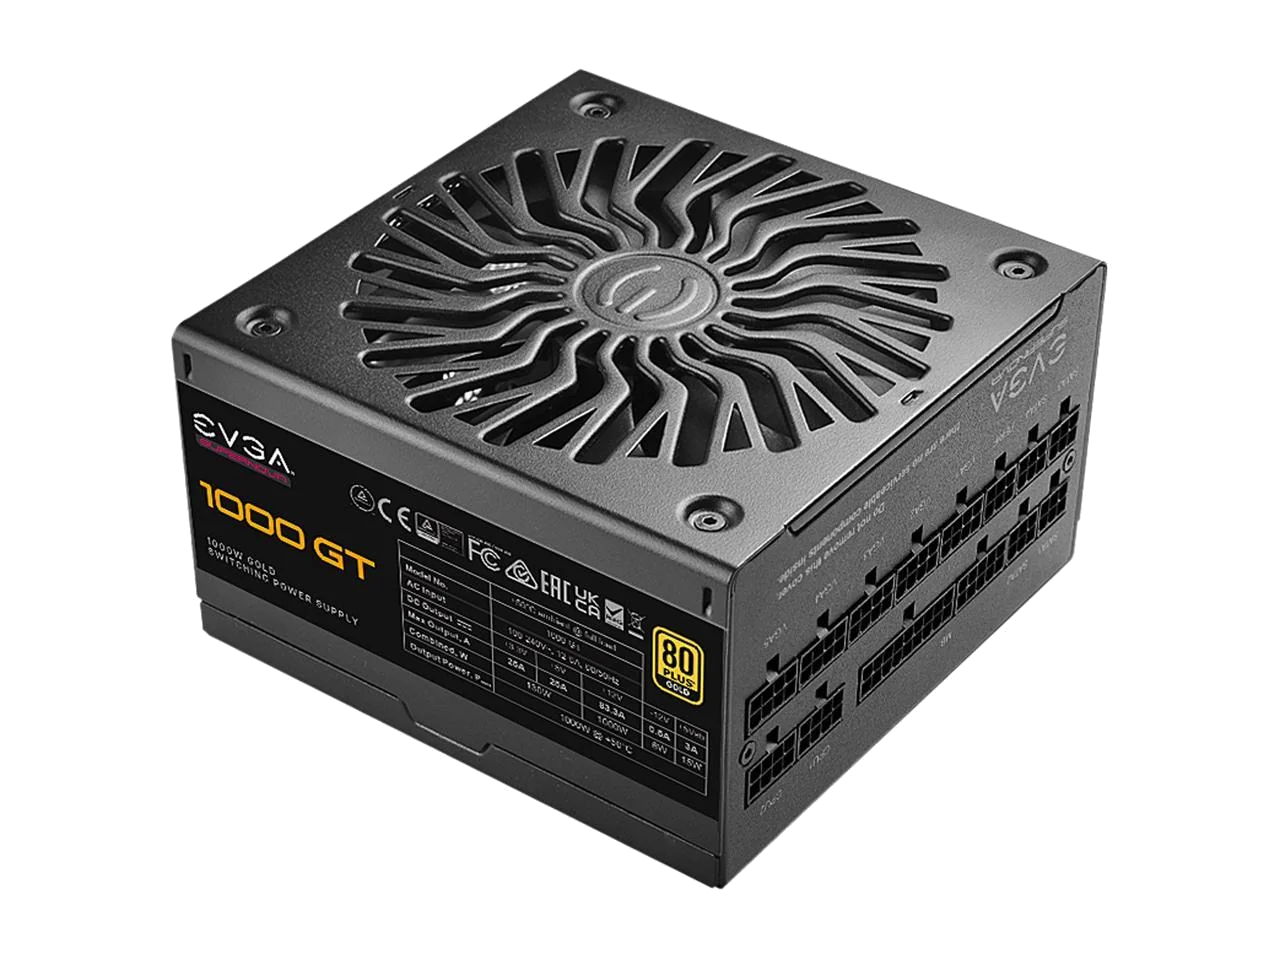
PowerEVGA power supply
Storage750GB SSD + 4TB HDD
24GBGDDR6 VRAM on the RX 7900 XTX
104MB+3D V-Cache on Ryzen X3D chips
The same components you'd pick for your own dream build — because that's exactly what these are. No cut-down server parts, no shared vGPUs.
No — you install games you already own from Steam, Epic, GOG, Ubisoft, Origin, Itch and more. We provide the hardware; you bring the library.
What distinguishes bare metal from a virtual machine?
Bare metal runs games directly on physical hardware without virtualization, delivering optimal performance with reduced overhead. VMs introduce extra layers that hinder graphics and processing speed. Bare metal gives you direct access to hardware resources for smoother gameplay. Bare Metal is our dedicated plan; Starter and Enthusiast are virtualized.
Can I play all my games on Linux?
Not all, but the majority of Steam games run well through Proton. Check compatibility for specific titles at protondb.com. Note that some multiplayer games with aggressive anti-cheat may not work.
What internet speed do I need?
1080p10 Mbps+
1440p40 Mbps+
4K UHD80 Mbps+
Aim for jitter under 10ms and latency under 120ms — a wired Ethernet connection (or 5GHz Wi-Fi) is recommended. Test your connection at speedtest.maximumsettings.com.
How long does setup take?
Your gaming PC is ready within 2–5 minutes of ordering. Be sure to check your spam folder for the welcome letter.
Is my hardware shared with other users?
Never — on any plan. Your hardware is yours alone. The only difference between plans is how they run: on the Bare Metal plan you run directly on the physical machine with no hypervisor; on Starter and Enthusiast your account runs on a virtual machine — still your own dedicated system, never shared.
Are my files saved when I log off?
Yes. Your data and game files persist between sessions. After 60 days of inactivity, your image is deleted and you'd need to reinstall your games. After 12 months of inactivity, your entire account is deleted and you'd need to register again. Note: switching from a virtualized plan to Bare Metal requires a fresh install on the new hardware — games, saves and settings don't carry over.
Can I stream games over Wi-Fi?
Yes, but a wired Ethernet connection gives the best results and is strongly recommended. If that's not possible, a router with a 5GHz signal works well — as long as your streaming device also supports 5GHz.
What jitter and latency should I expect?
For most games, jitter around 10ms or less and latency below 120ms delivers a smooth, responsive experience. Fast-paced competitive games benefit from even lower latency. Your actual values depend on your connection quality and distance from the data center — test yours at speedtest.maximumsettings.com.
What operating system do the rigs run?
Linux Mint by default — lightweight, secure and gaming-optimized, with the majority of Steam titles compatible via Proton. On the Bare Metal plan you can also install an operating system of your choice — in a VM with full GPU passthrough .Linux Mint is the default OS, running on bare metal for maximum performance. You can also bring your own OS and run it in VM mode, which may introduce a small performance overhead. Custom operating systems must be installed manually, and you must provide your own ISO files and any required licences. You can install multiple operating systems and switch back to Linux Mint on bare metal with a single reboot.
Do you own your facility?
Yes. Maximumsettings is a privately owned company with its own facility. We do not colocate — the hardware is ours, end to end.
Still have questions? Ask about a game, device or OS setup before you choose. Our AI assistant is available 24/7, and you can also contact support.
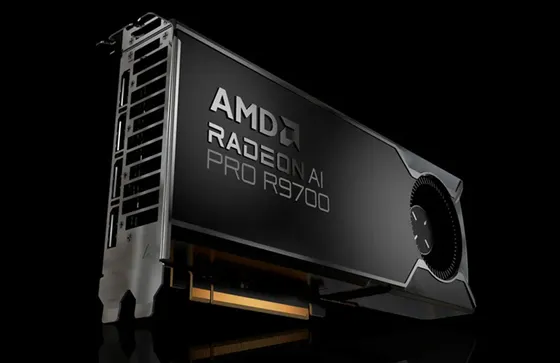
Hardware Evolution — Coming Soon: AMD Radeon™ AI PRO R9700
We are redefining cloud capability. Our infrastructure is currently scaling up to include the cutting-edge AMD Radeon™ AI PRO R9700 video cards, boasting a massive 32GB of VRAM.
Whether you are pushing high-fidelity gaming to its limits or crunching complex AI workflows, this immense memory capacity ensures uncompromising raw power. Prepare for higher frame rates, ray-tracing excellence, and superior compute performance.
Introducing: The Maximizer
We've removed the friction between you and your game. The new Maximizer App completely streamlines your cloud experience, allowing you to bypass the control panel entirely.
Instant Direct Boot — automatically log in and boot your gaming rig without ever visiting the web control panel.
Smart Auto-Pairing — new customers enjoy seamless setup. No PIN authentication required — just install and play.
In-Game Overlay — keep track of your session with real-time time allowance and credit tracking directly on screen.
Smart Session Management — includes Auto-Shutdown and a helpful 10-minute warning before your session or credits end.
Ecosystem Upgrades
Core Performance. Our cloud gaming images have been rebuilt from the ground up — now running on Linux Mint 22.2 with Kernel 6.17.10 and the latest Mesa 25.3.1 drivers. Expect smoother frame pacing, lower latency, and better compatibility with the latest titles.
Pegasus Frontend. Manage your collection in style with Pegasus, a cross-platform, highly customizable graphical frontend — perfect for launching emulators and organizing your entire game library in one sleek interface.
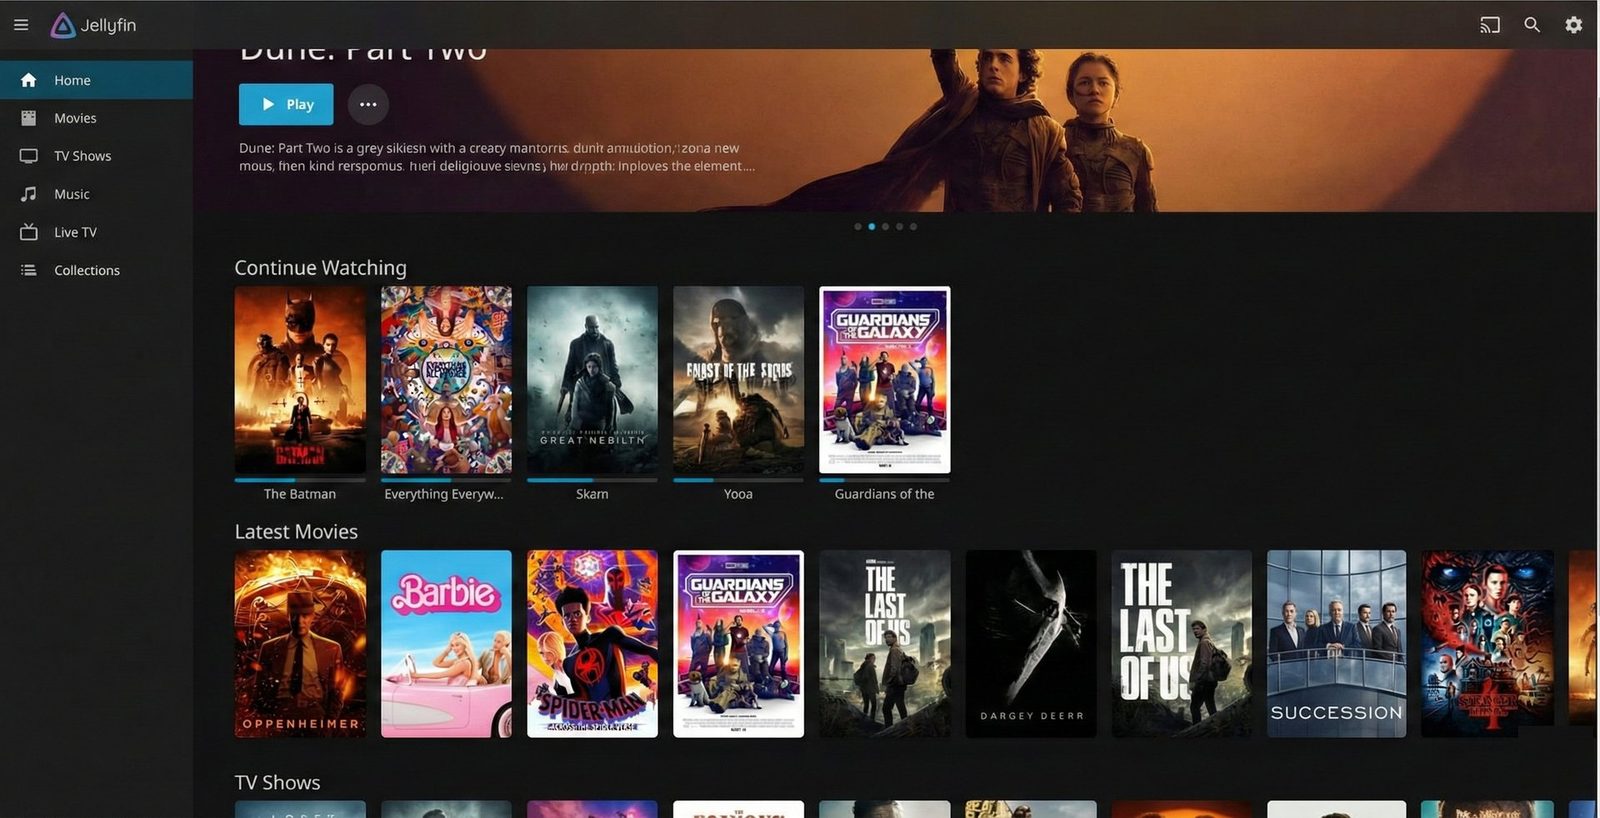
Jellyfin Media. Your server, your media. Jellyfin is now available, putting you in complete control. Stream your movies, music, and shows to any device directly from your Maximum Settings server. No subscriptions, no strings attached.
Experience the Upgrade
With powerful new R9700 hardware on the horizon and the effortless Maximizer app available today, there has never been a better time to jump in. Sign up today — already a member? Download the Maximizer App.
Hardware availability: the new AMD Radeon™ R9700 hardware will be added exclusively to the Bare Metal Plan. App compatibility: the Maximizer App requires the latest system image — existing users must perform an upgrade from their desktop environment.
Before you start: installation must be done in Gaming mode — the Star Citizen custom launcher will not load in console mode. You must also be on the Bare Metal plan; Star Citizen will not work on any VM-based plan.
Easy method: our installer
The simplest way to install Star Citizen on our cloud gaming service is our custom .deb installer, which walks you through the process with minimal input required: Download Starcitizen.zip
If you'd rather install it manually, follow the full instructions below.
Manual installation
Step 1 — Set up ZRAM. Install the ZRAM tools, which improve system performance by compressing memory:
sudo apt install zram-tools
Enable the LZ4 compression algorithm — this makes memory compression faster and more efficient:
sudo sed -i "s/^#ALGO=lz4/ALGO=lz4/" /etc/default/zramswap
Allocate 50% of your system's memory for ZRAM:
sudo sed -i "s/^#PERCENT=50/PERCENT=50/" /etc/default/zramswap
Remove any existing vm.page-cluster settings from the system configuration file:
sudo sed -i "/vm.page-cluster/d" /etc/sysctl.conf
Add a new setting that optimizes how memory pages are grouped, which can improve performance:
sudo sed -i -e '$a'"vm.page-cluster = 0" /etc/sysctl.conf
You will need to restart the operating system for the ZRAM settings to take effect. Open the terminal and run:
sudo reboot
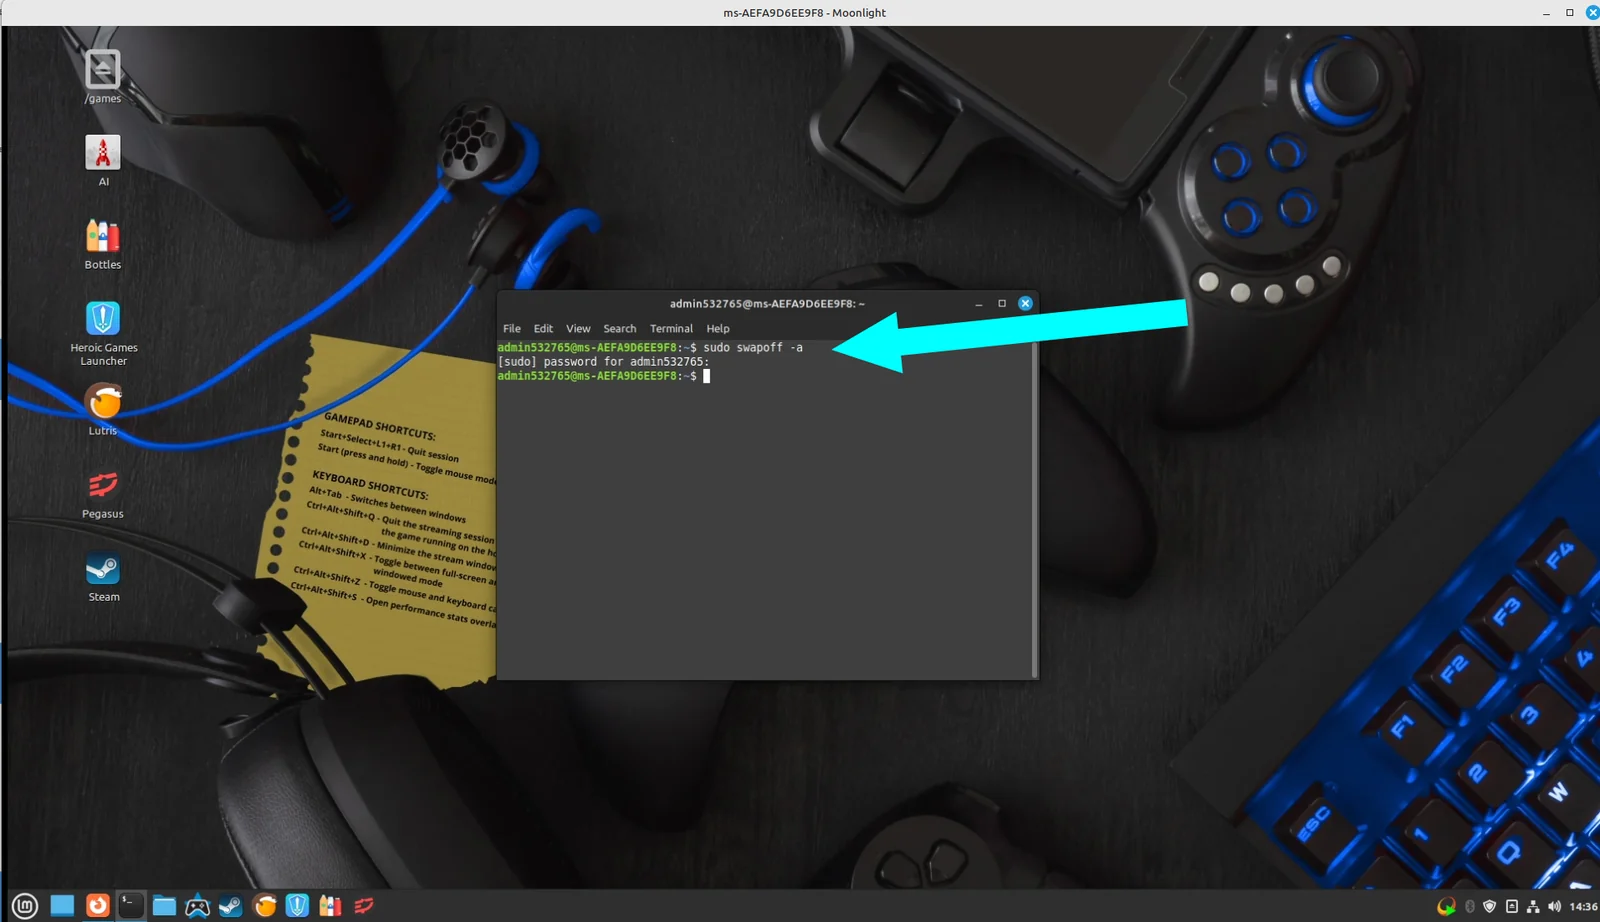
Manual installs: you will need to manually disable swap each time you launch Star Citizen. Enter sudo swapoff -a in the terminal every time you run the game.
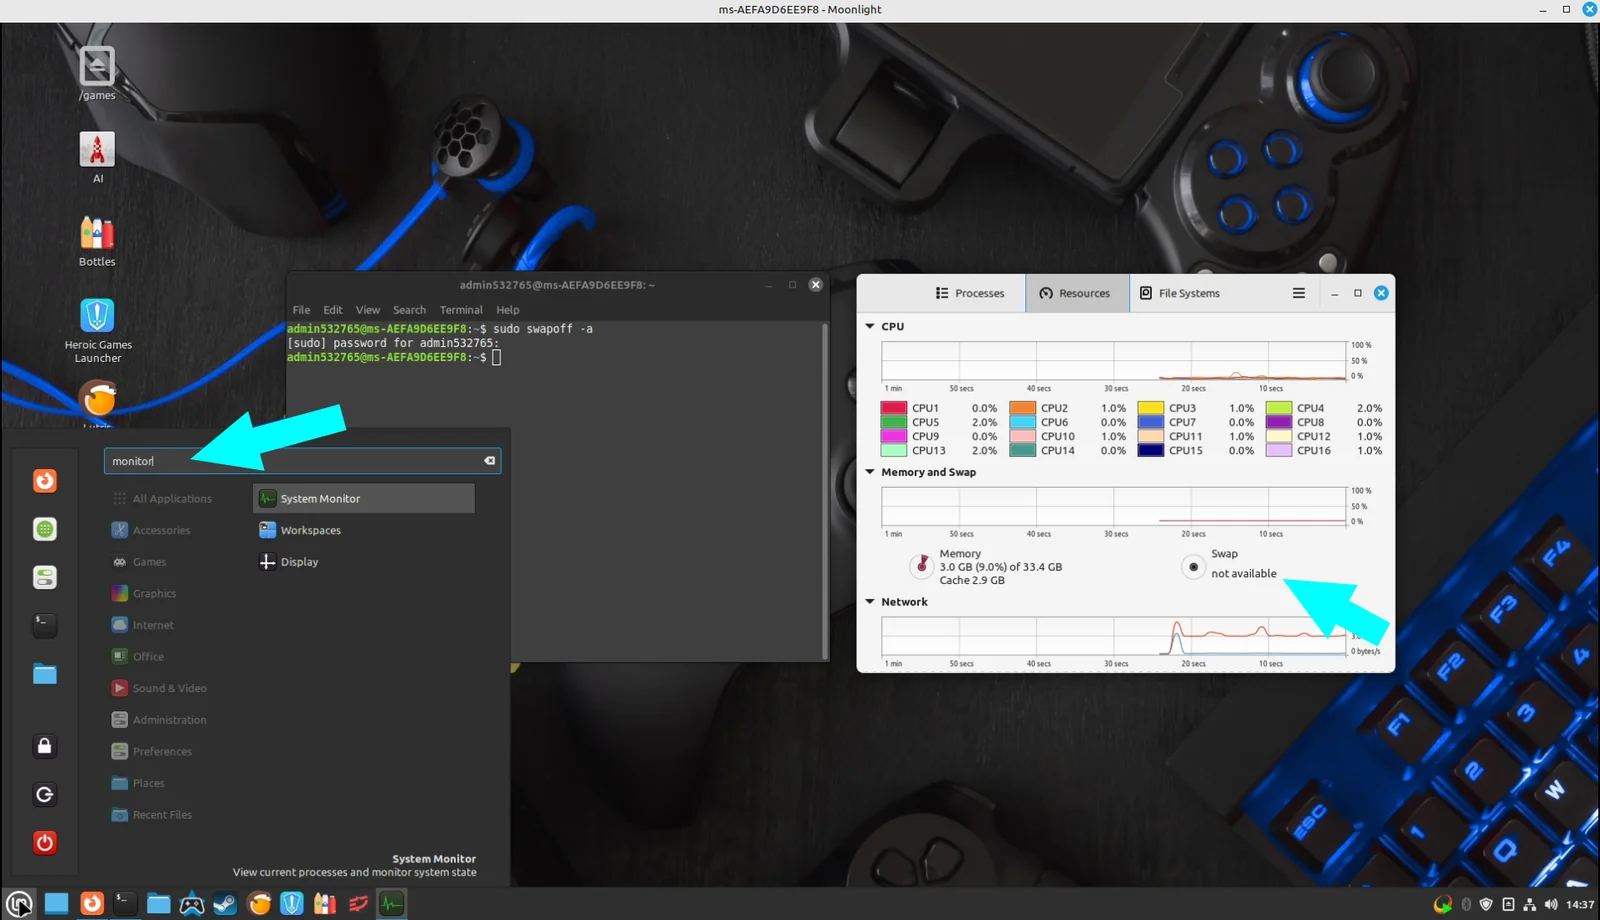
Step 2 — Confirm swap is off. Bring up the Linux Mint System Monitor and confirm that swap has been turned off.
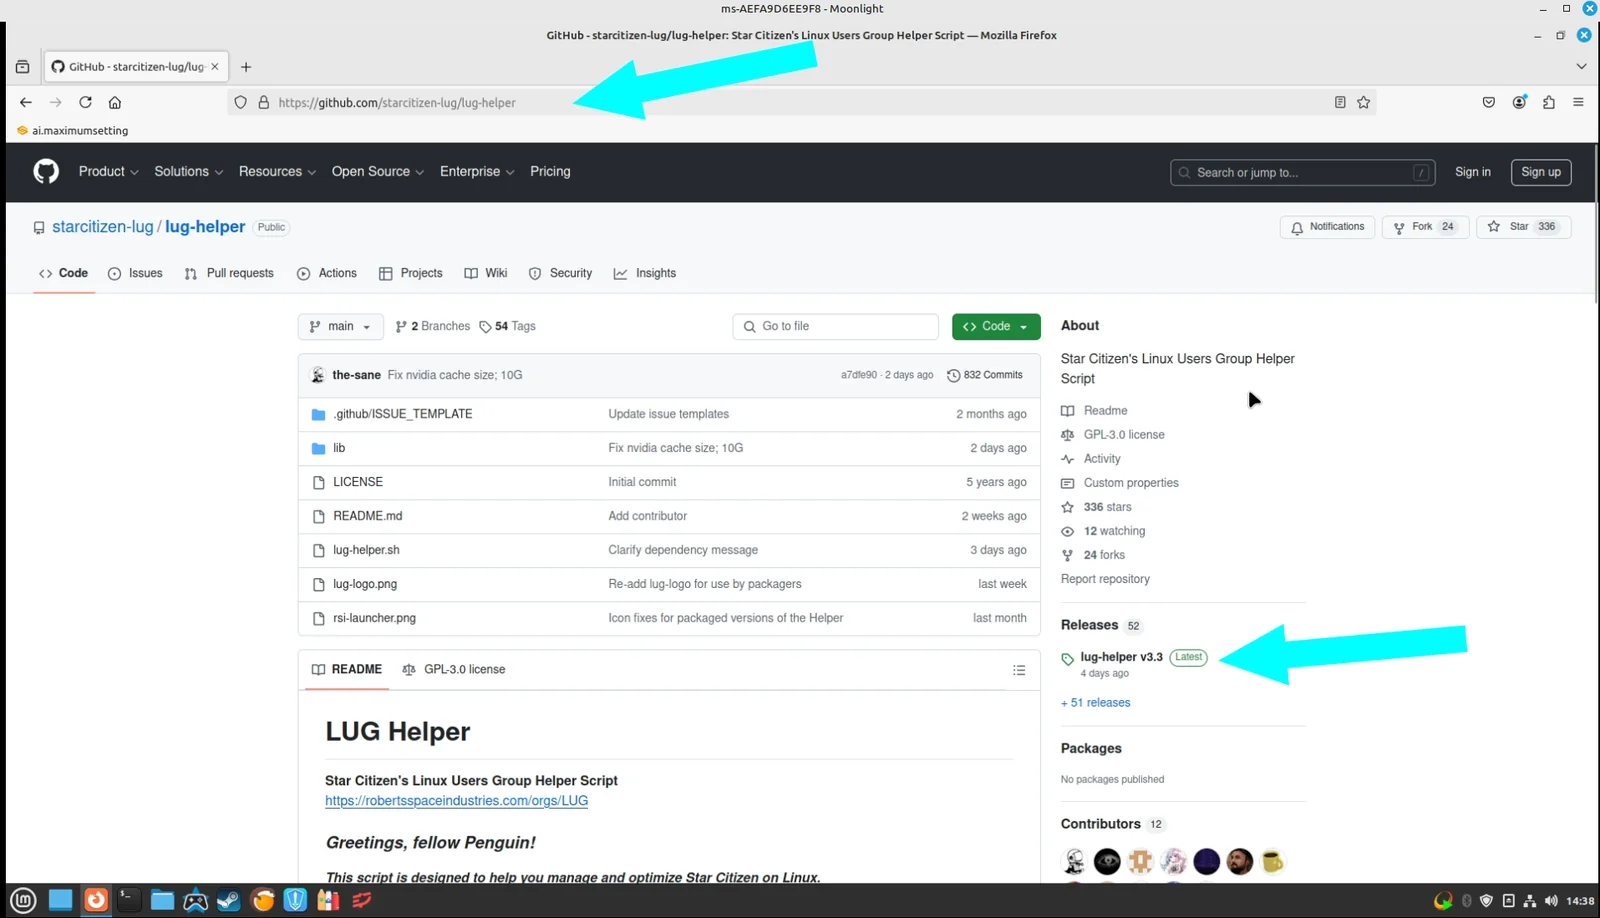
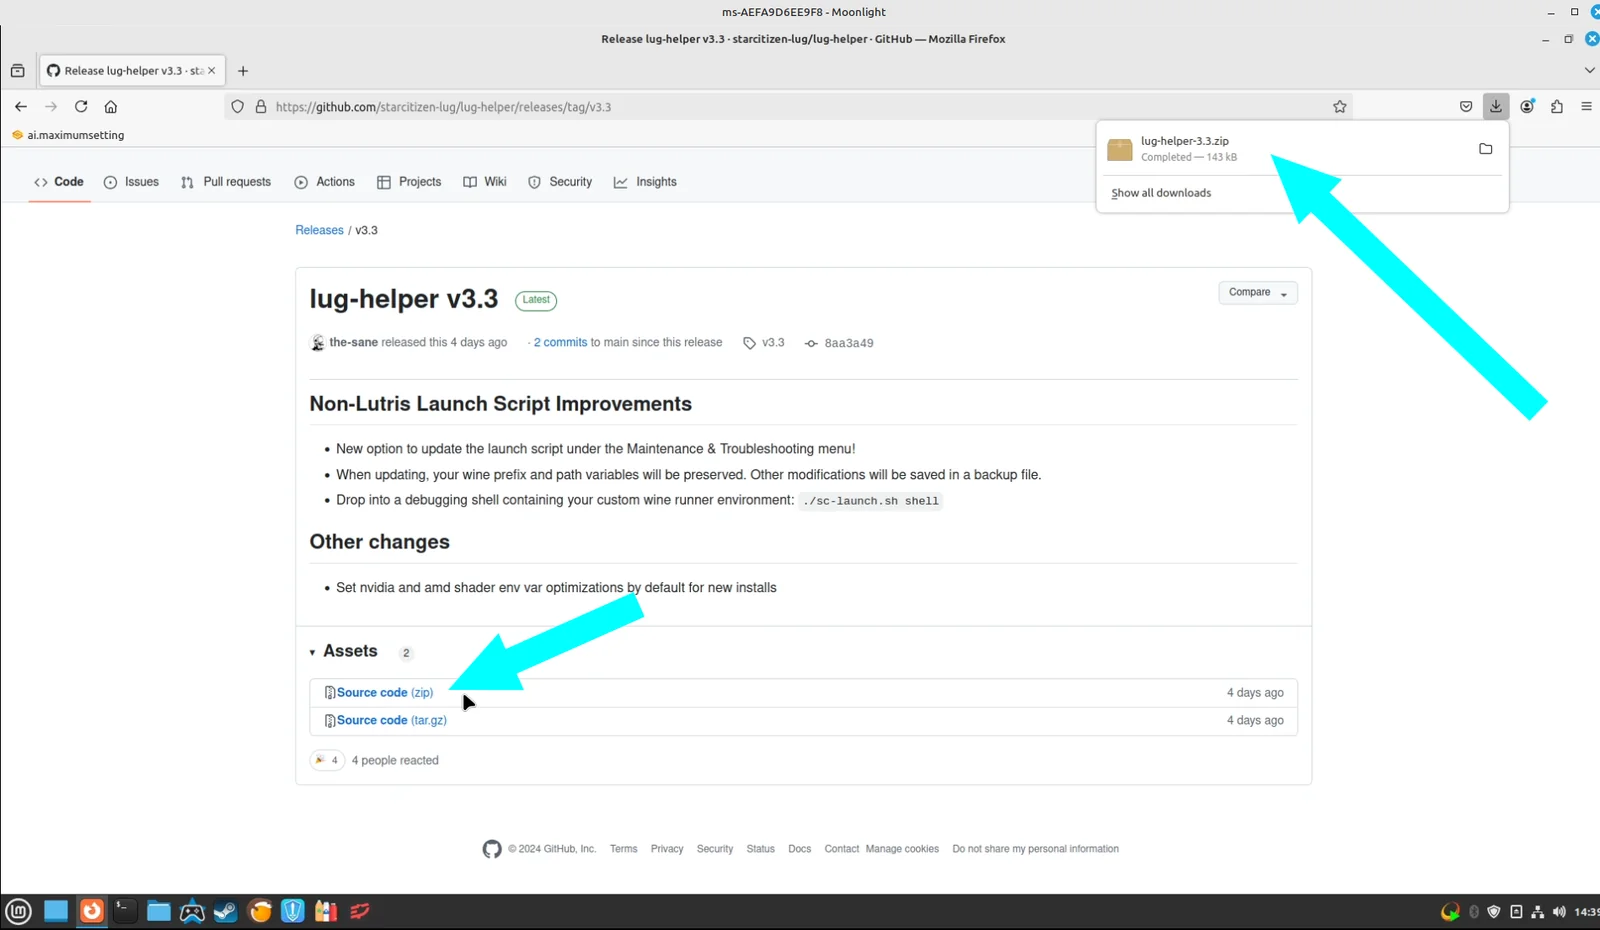
Step 4 — Get the source. Download the source.zip version of the installer helper script.
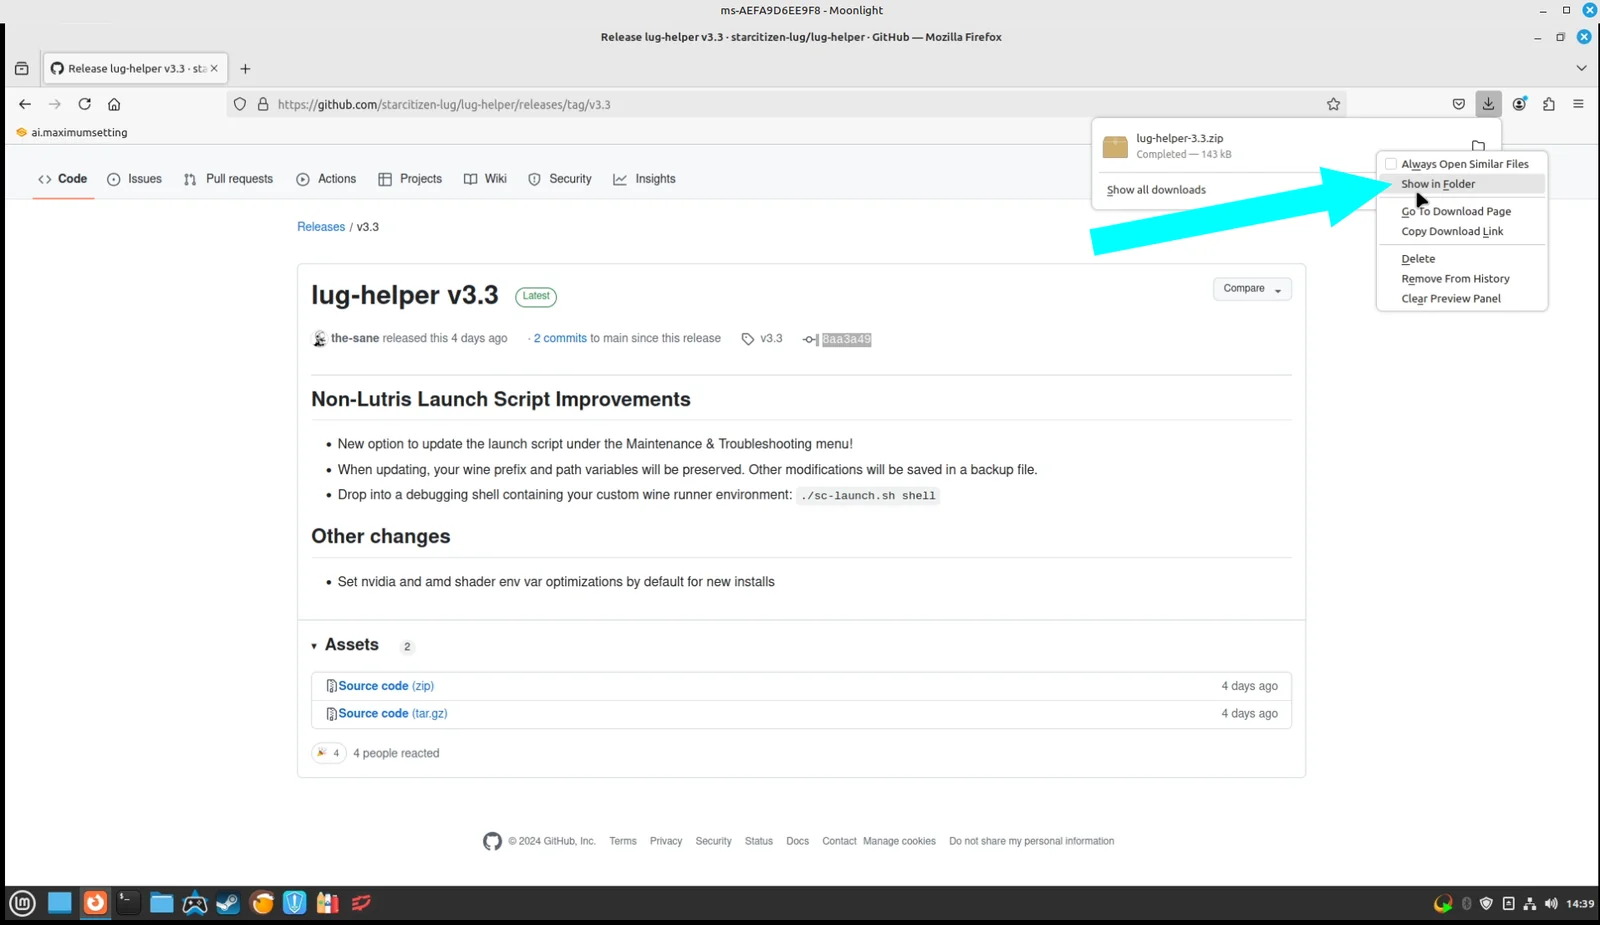
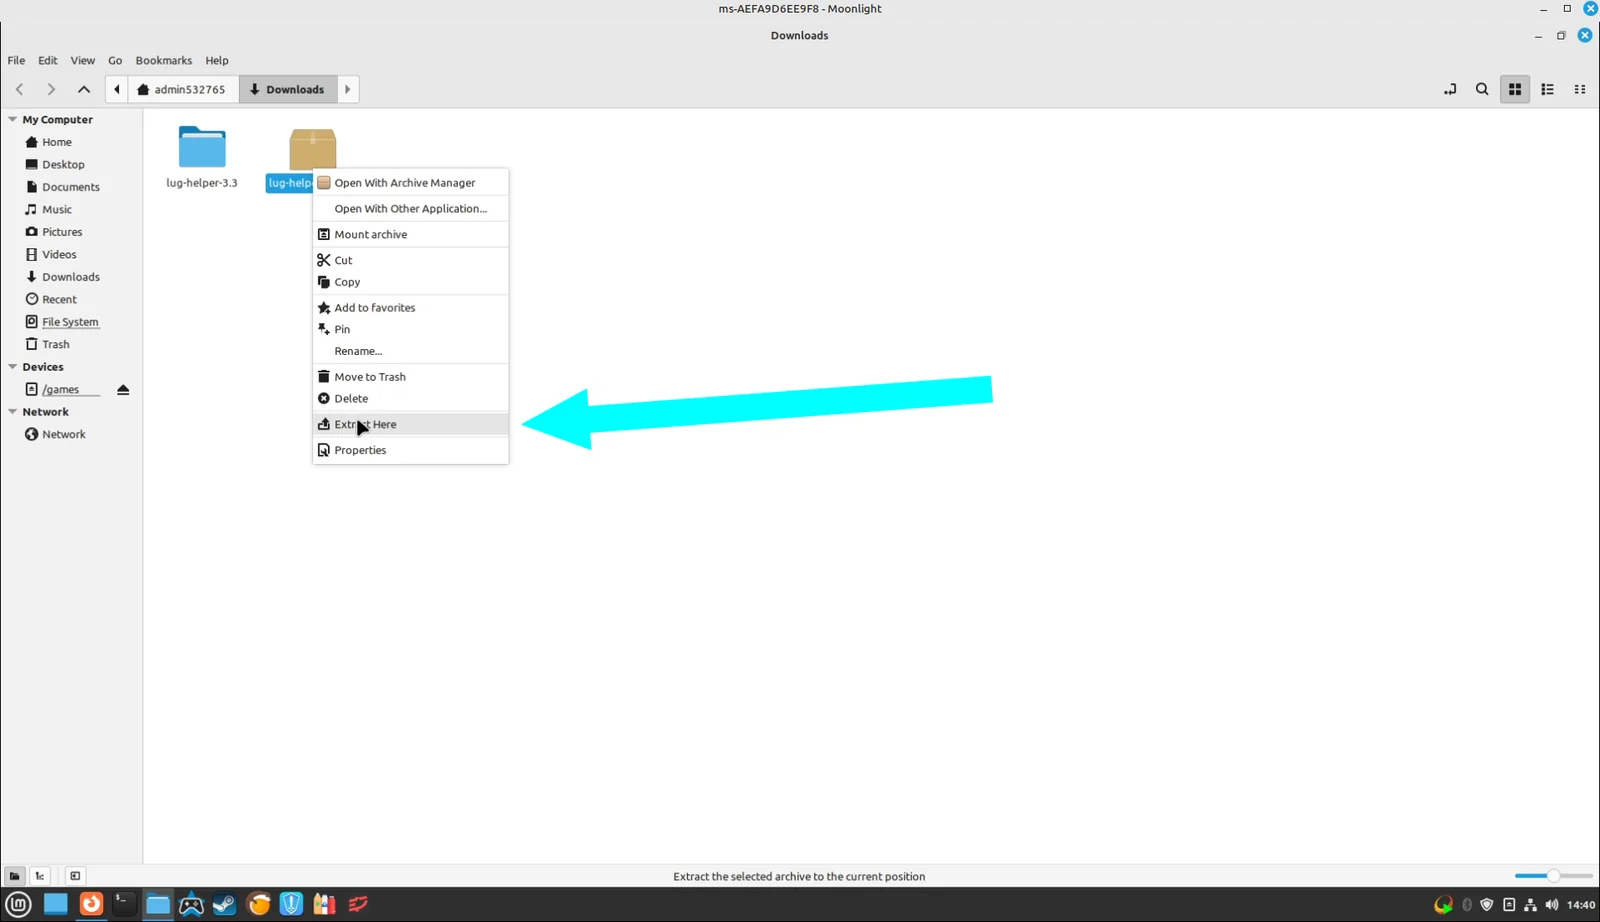
Step 5 — Show in folder. Head over to the download folder: right-click the download, then click "Show in Folder".
Step 6 — Extract. Right-click on the source.zip file and extract it.
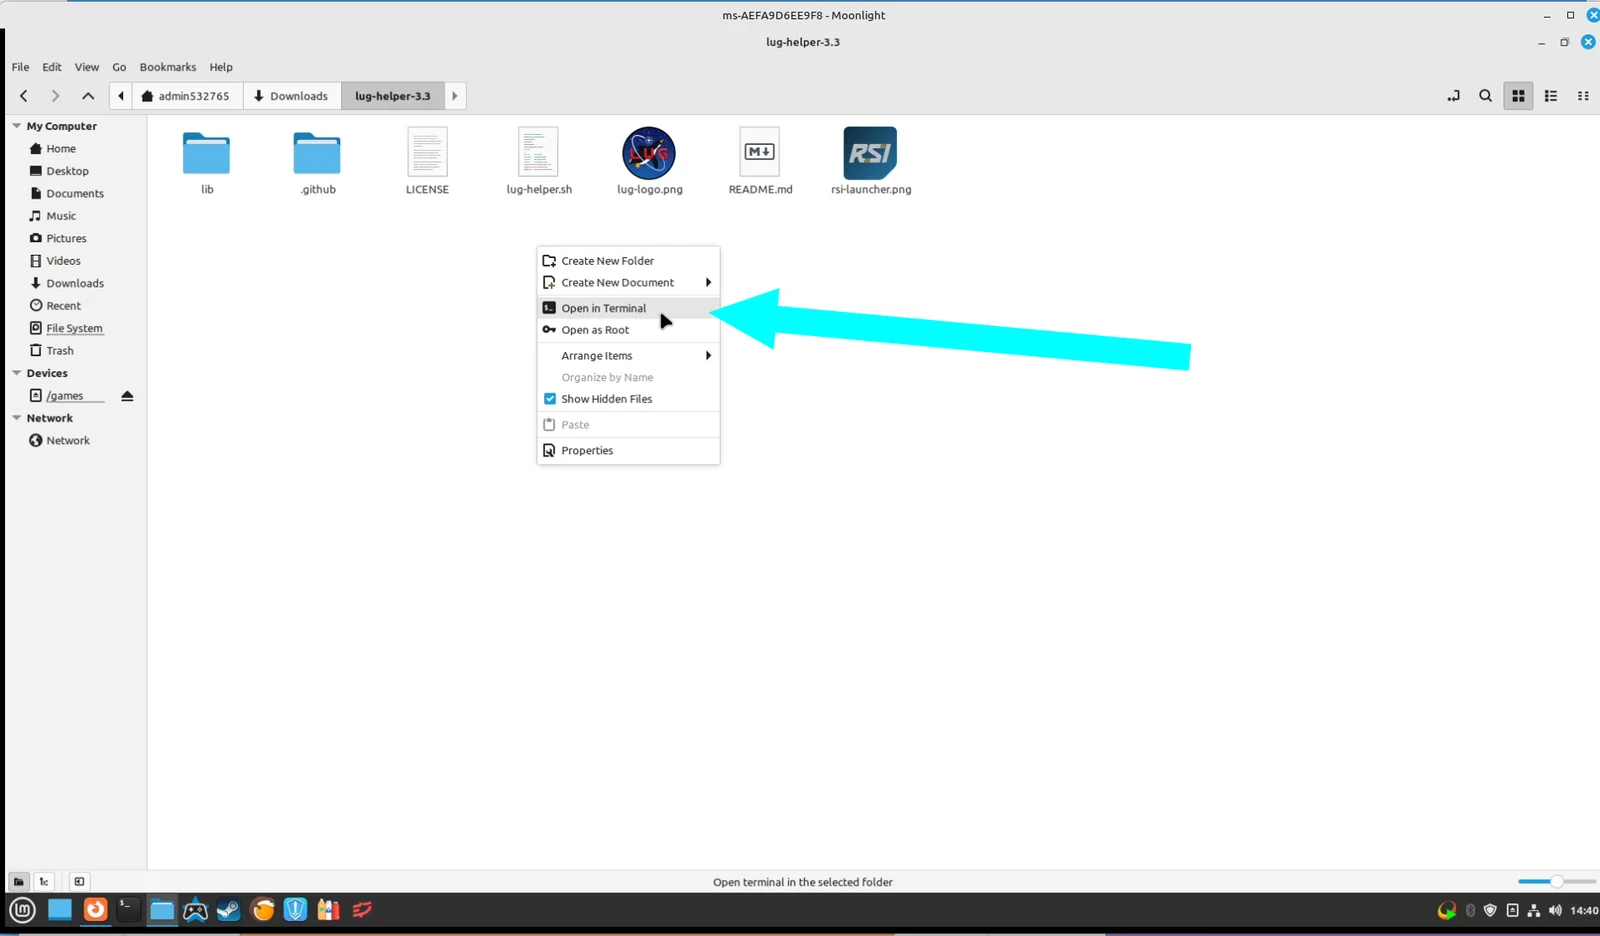
Step 7 — Open a terminal. Double-click on the extracted folder, then right-click on an empty area and select "Open in Terminal".
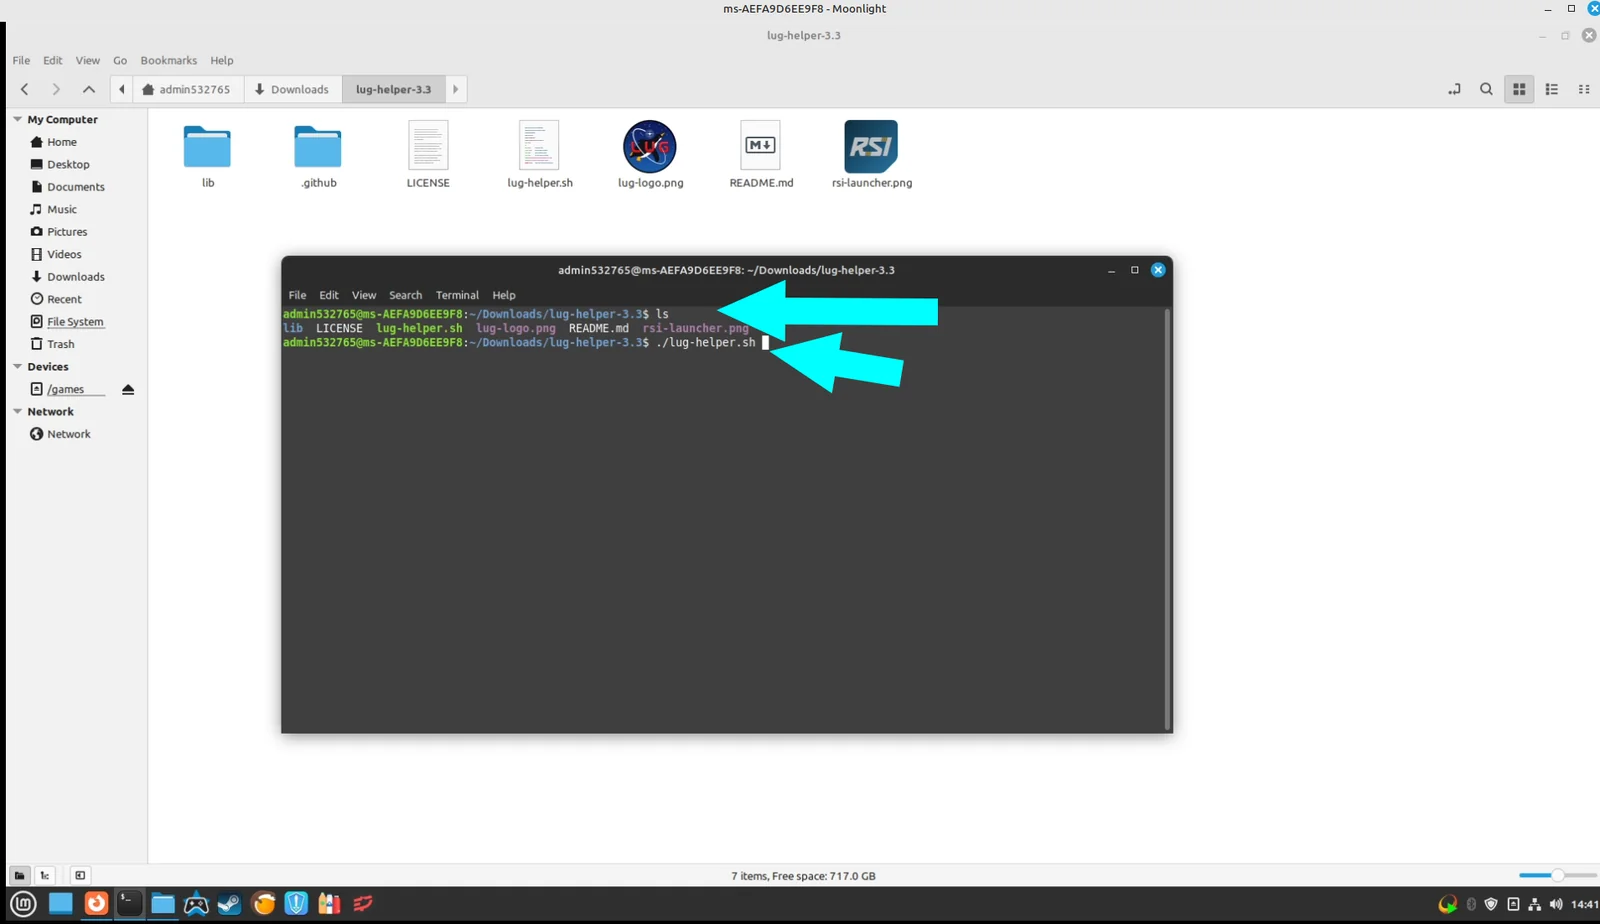
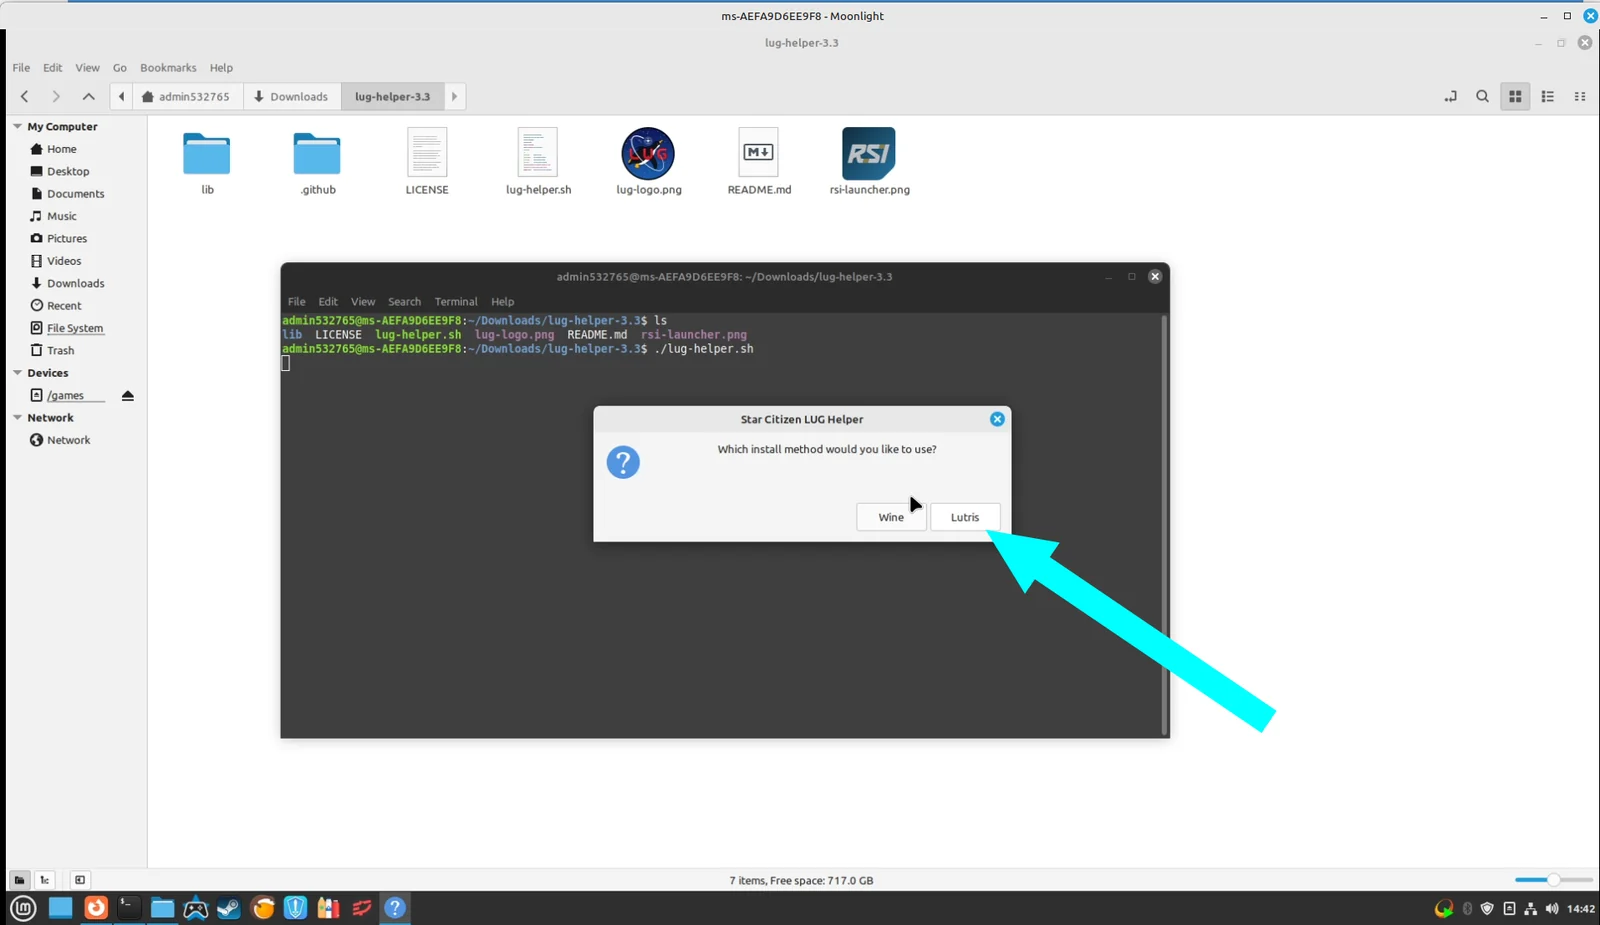
Step 8 — Run the helper. Type ls and press Enter to look for the lug-helper.sh file. To run it, type ./lug-helper.sh and press Enter. The script will prompt you for the Linux admin password, which can be found in the welcome letter.
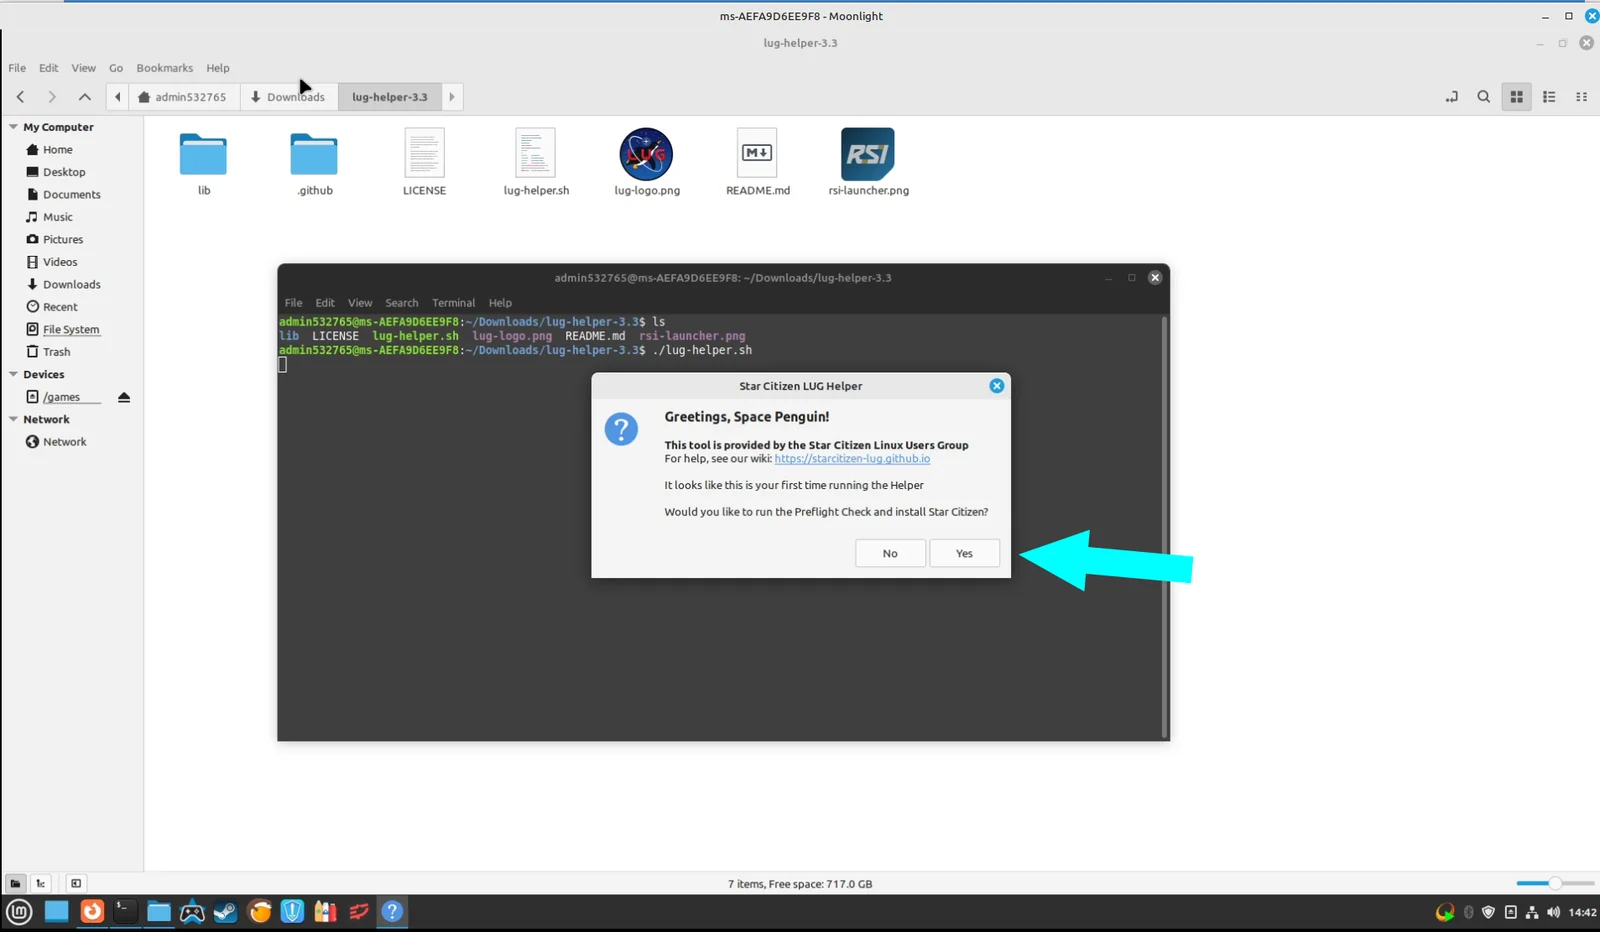
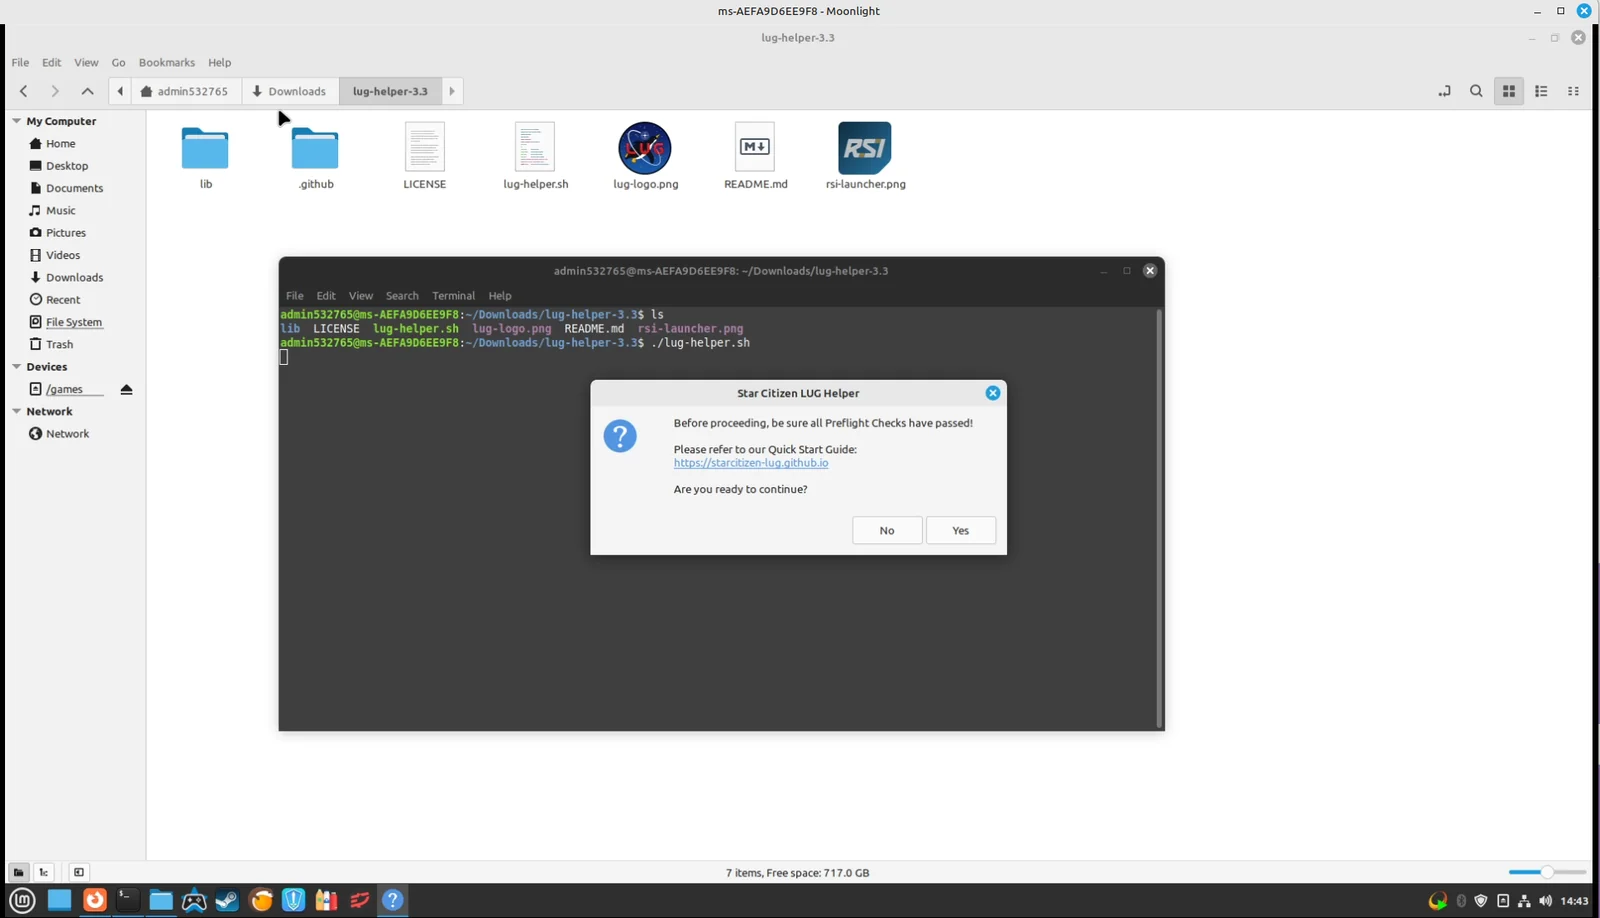
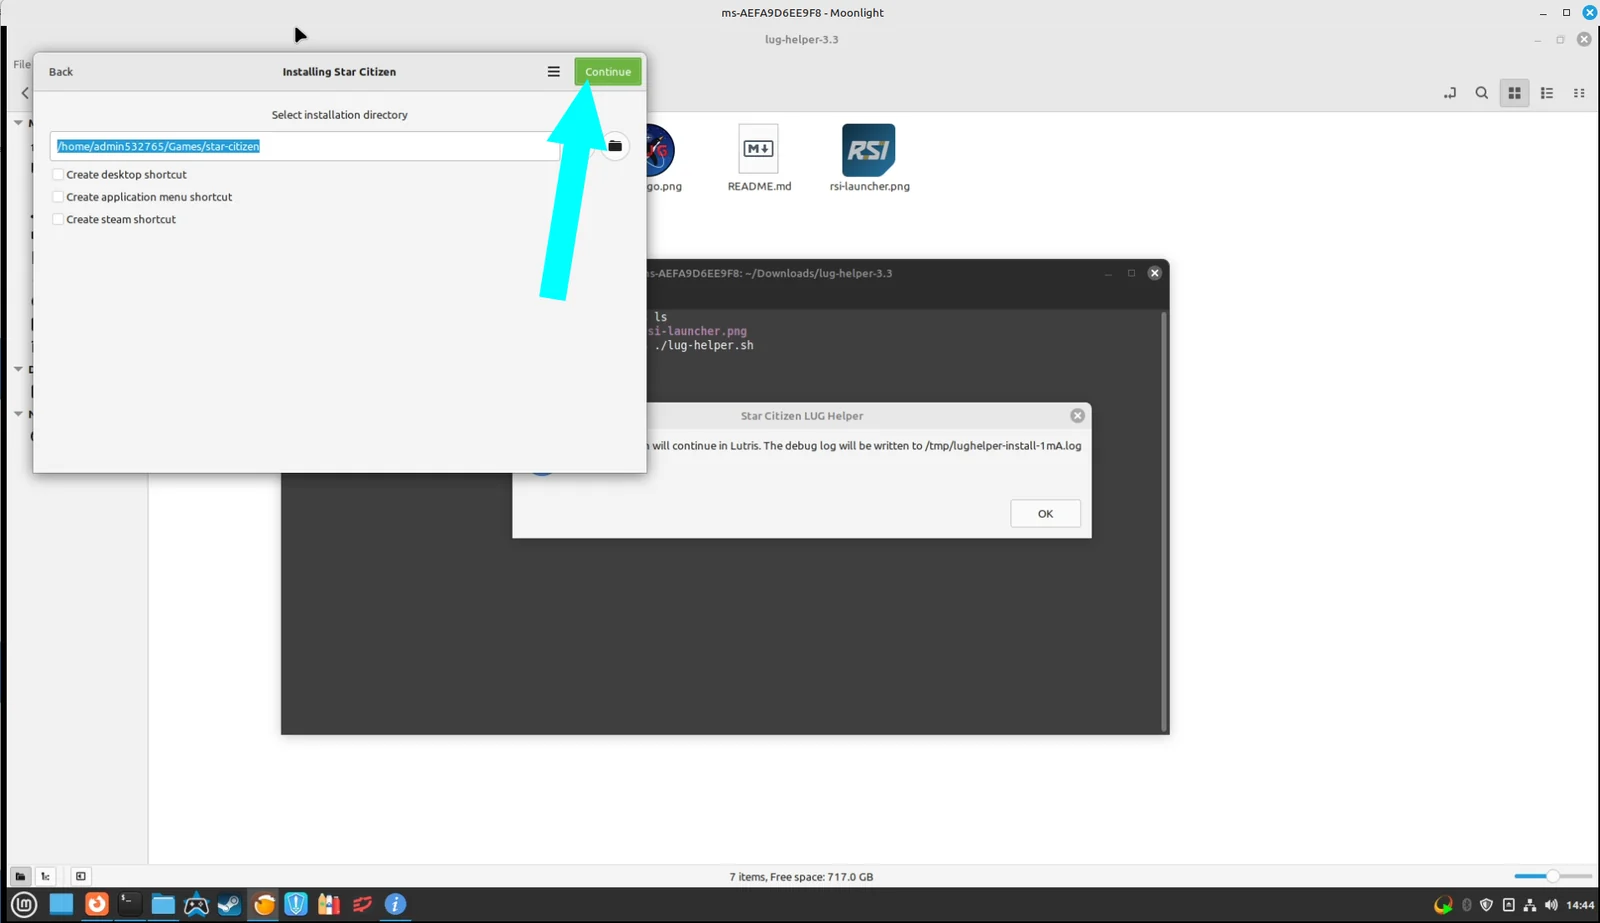
Step 9 — Begin install. This launches the Star Citizen installation. Click "Yes" on this screen.
Step 10 — Choose Lutris. Select the Lutris option since it offers the best compatibility.
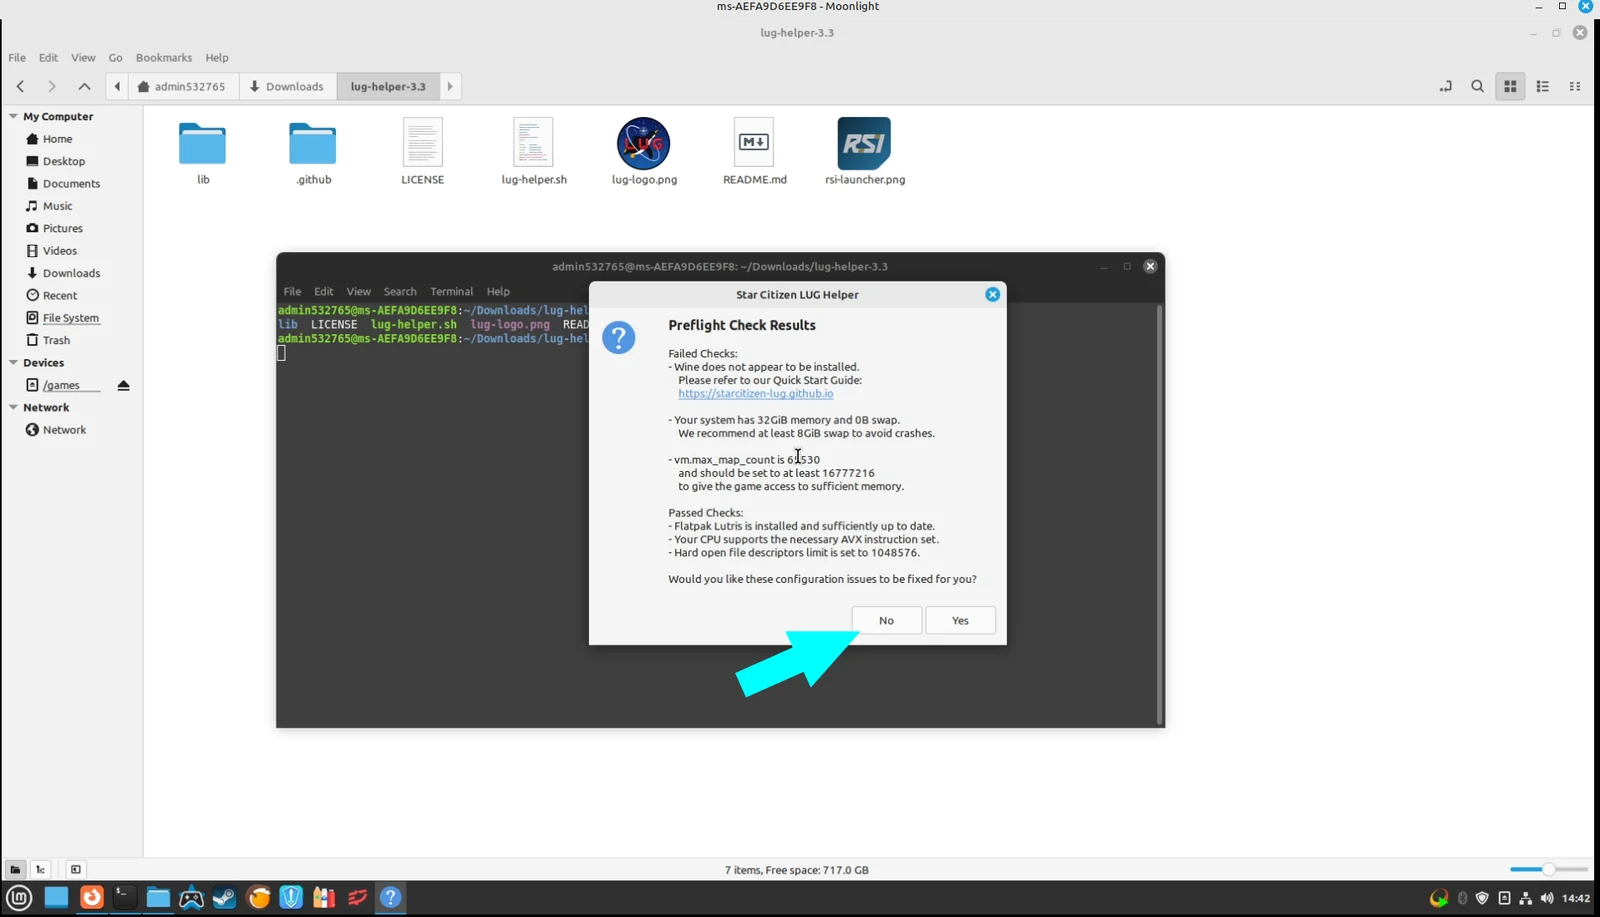
Step 11 — Decline swap. It is extremely important that you click No here. Swap can cause random crashes with our current setup — don't worry, our bare metal system has enough RAM and VRAM to run the game without any swap.
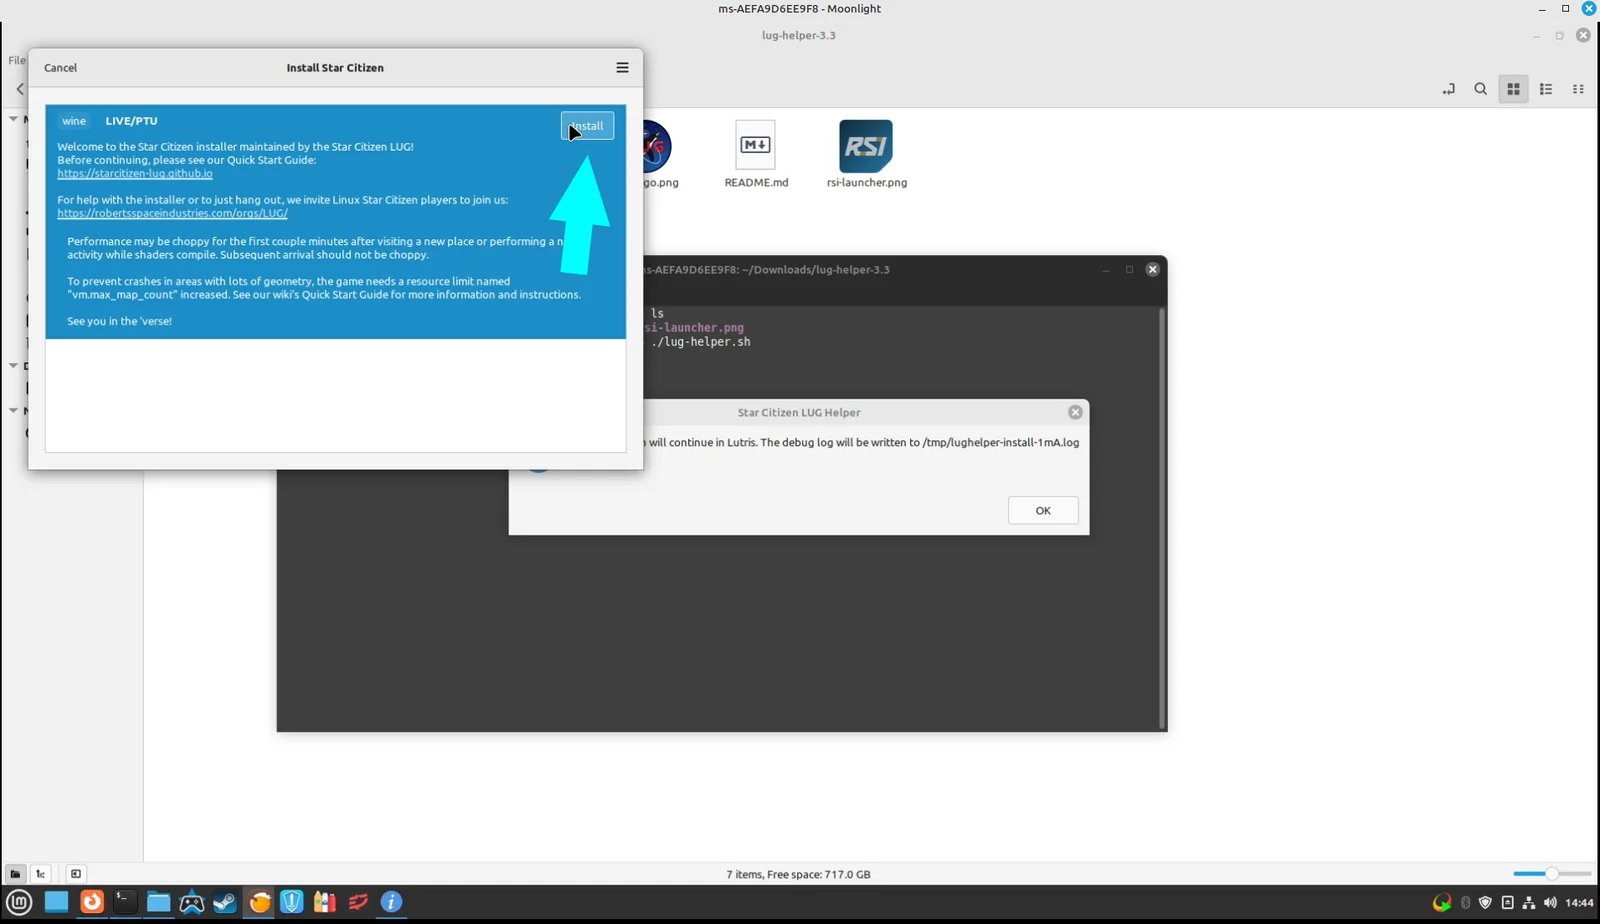
Step 12 — Confirm. Click "Yes" in the next window.
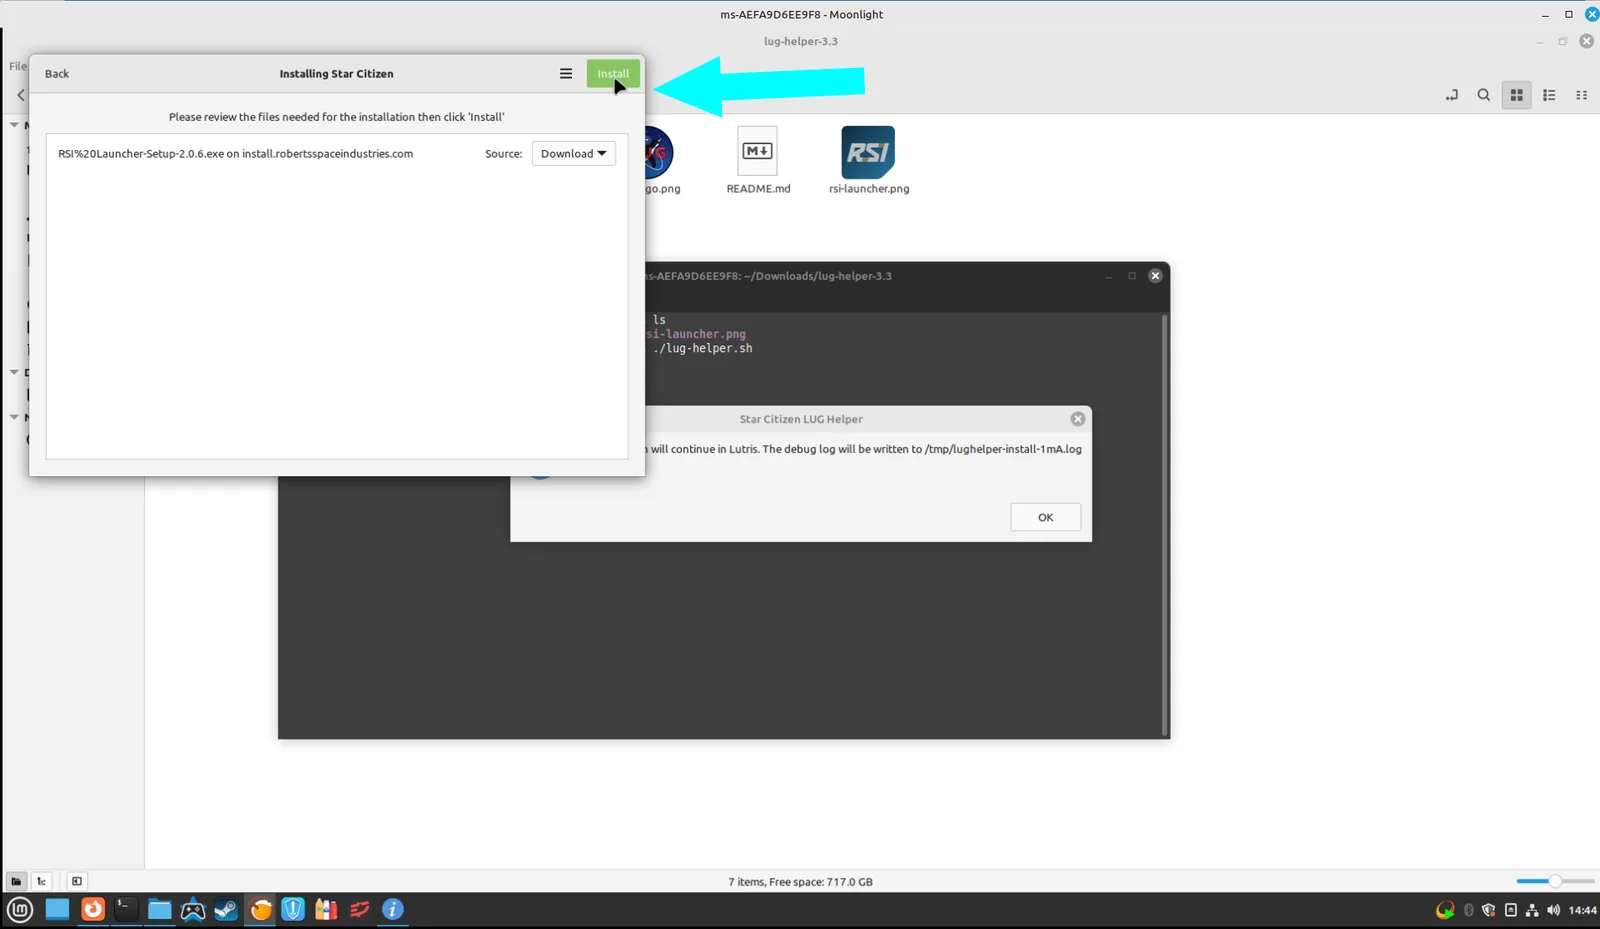
Step 13 — Lutris installer. Another window opens — the Lutris installer. Click "Install".
Step 14 — Continue. Please continue through the installer.
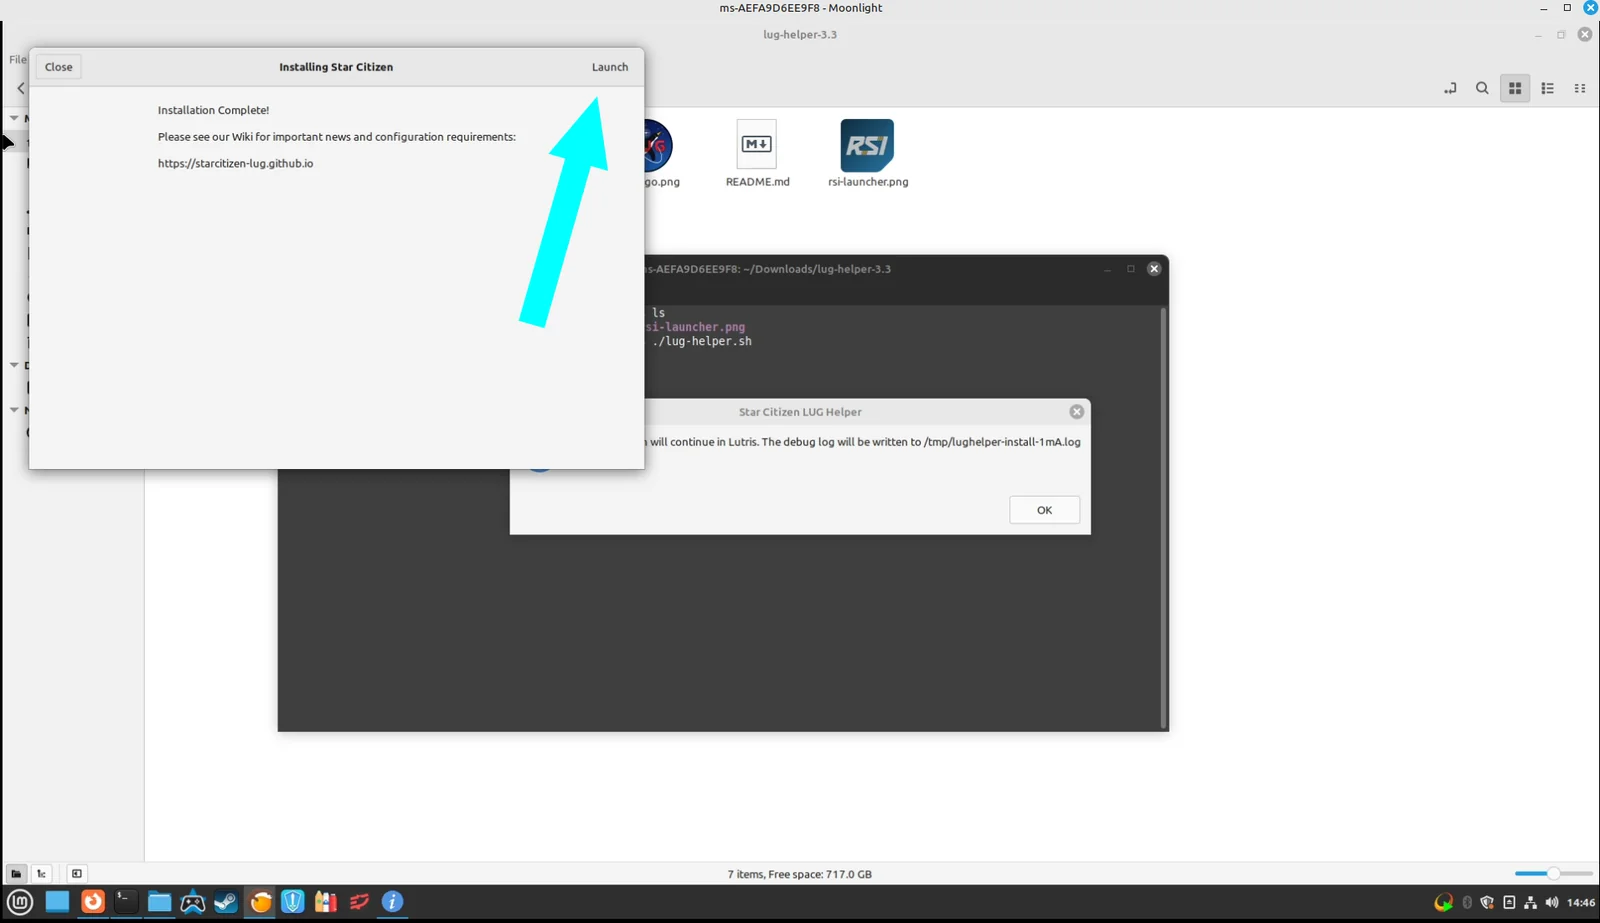
Step 15 — Download the launcher. Click "Install" to download the launcher. This may take a few minutes.
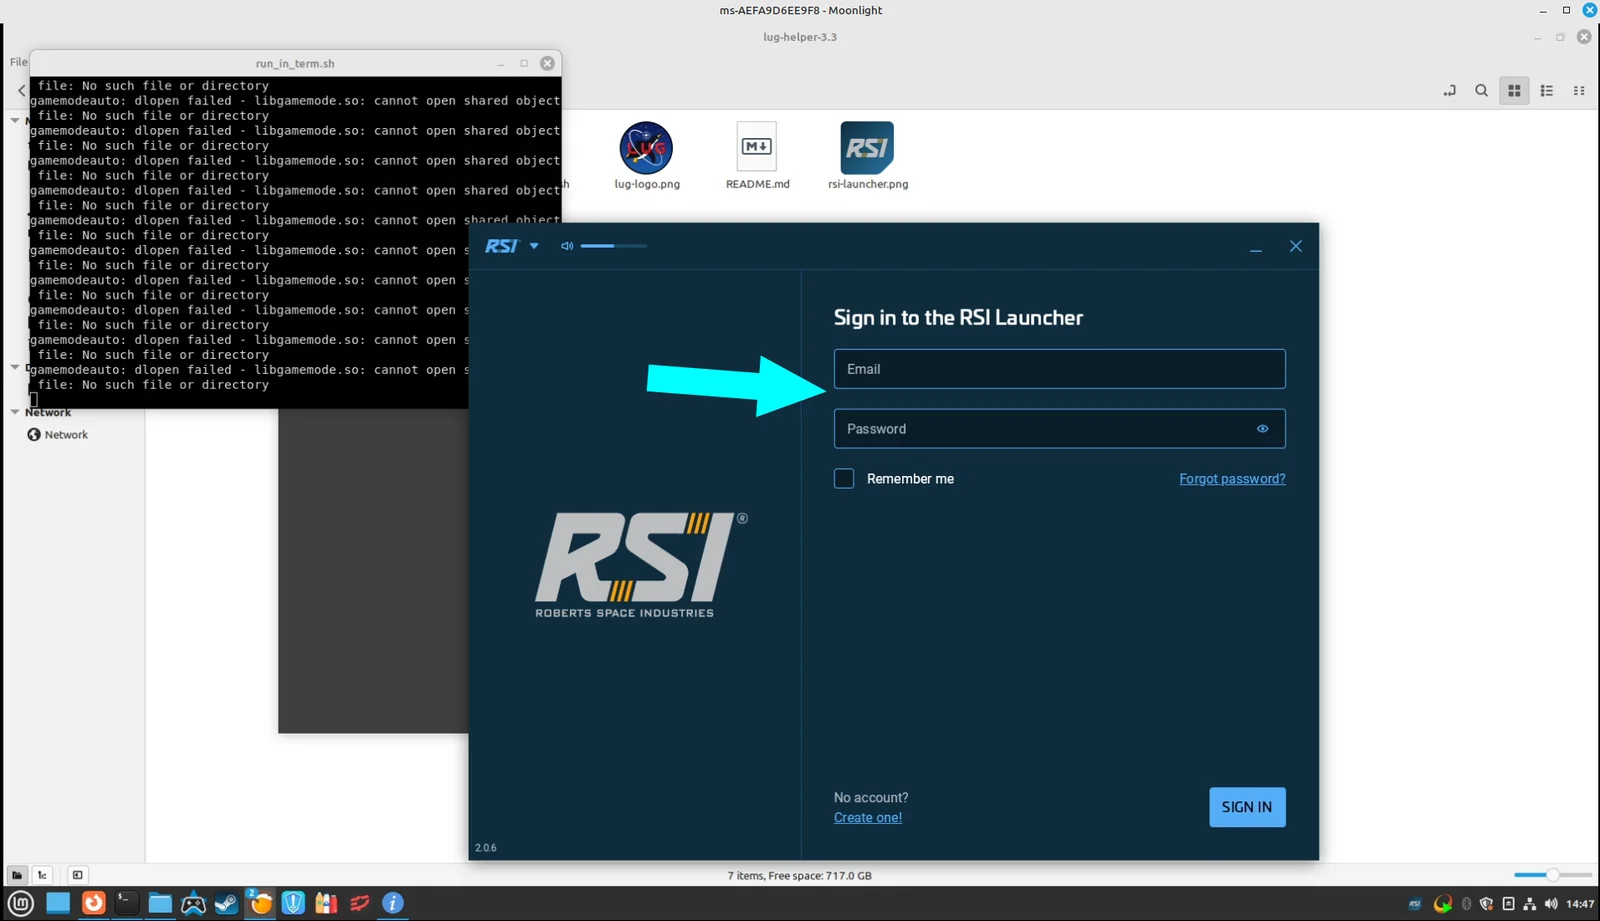
Step 16 — Launch. Click "Launch" to bring up the Star Citizen custom launcher. This can take a few seconds, so don't quit too early.
Step 17 — Done. As mentioned above, this needs to be done in Gaming Mode — the Star Citizen custom launcher requires a GPU and will not launch in Console mode. That's it, you're all done.
Hello fellow gamers!
By uploading videos to MaxMedia, you agree to allow Maximumsettings to re-upload the video to the Maximumsettings YouTube channel in exchange for 5 hourly gaming credits per video.
Requirements to get the 5 hourly credits
Video upload must be recorded at 720p, 1080p, 1440p or 4K
The recording quality must be set at a QP of 23 or lower if using OBS, or its equivalent if using other recording software
The video must be a minimum of 5 minutes and no longer than 30 minutes
You have the best chance of approval if you're uploading a game we do not yet have — for e-sports titles like Counter-Strike or SC2, please ensure it is a unique video for that game
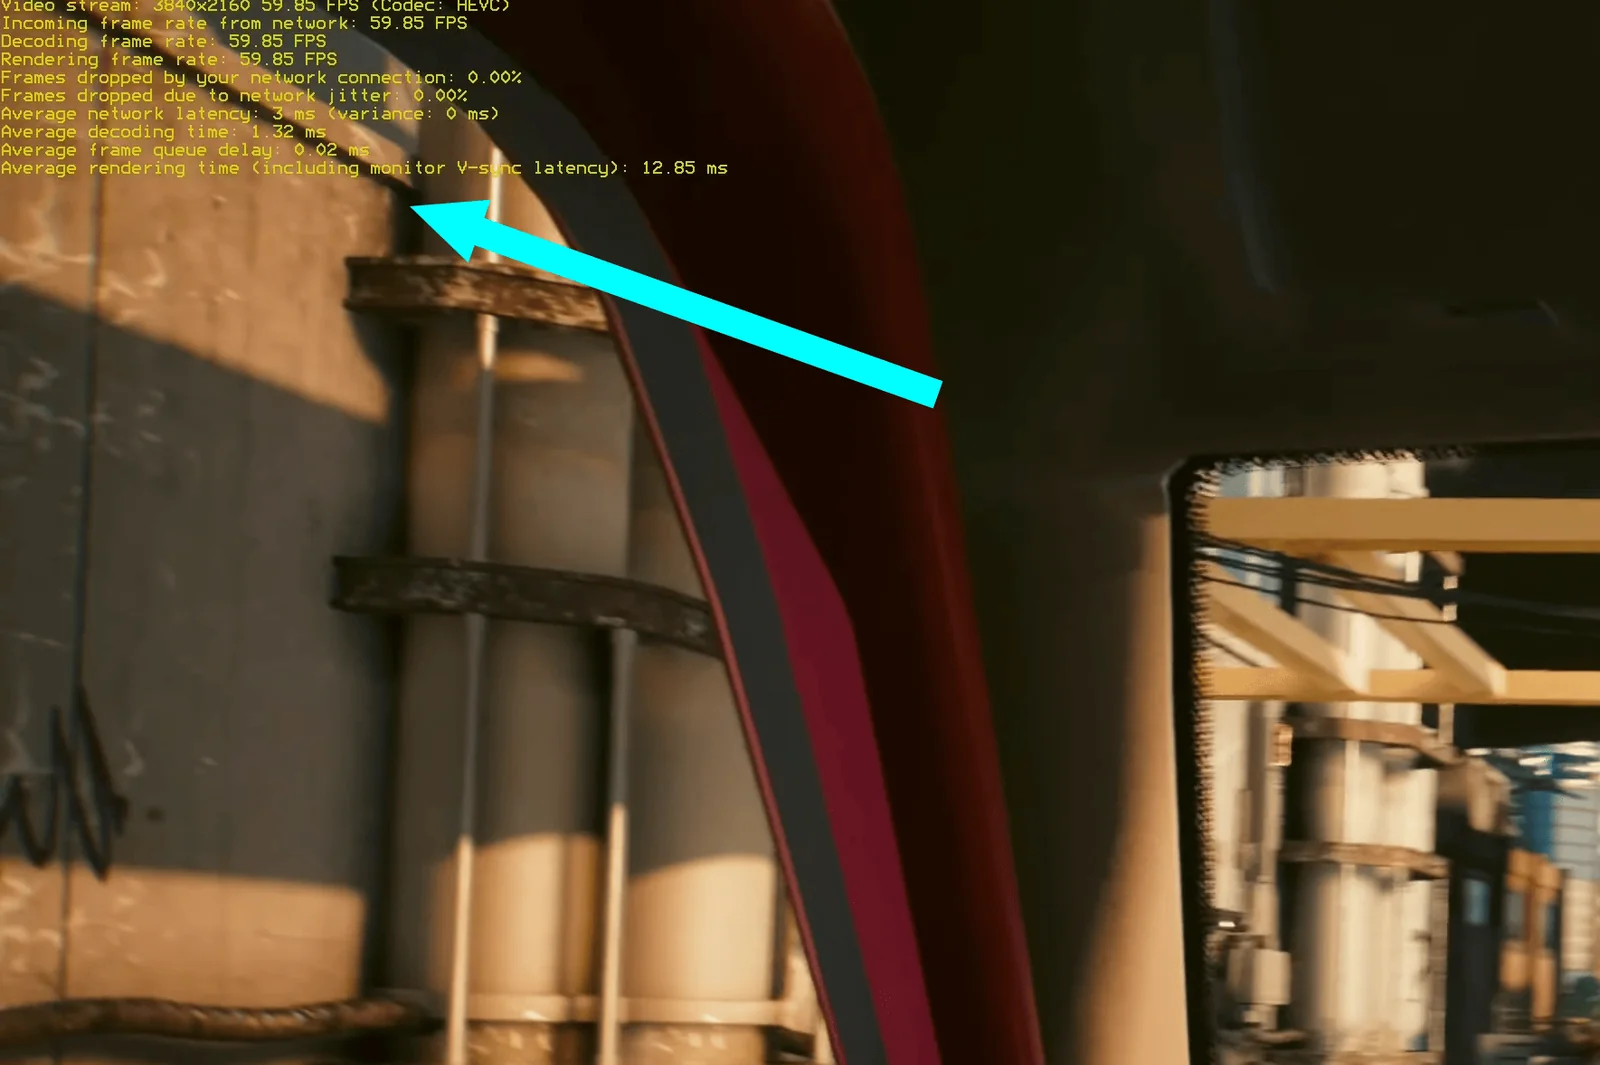
It's important that any game demo video uploaded includes the Moonlight stats overlay to prove it was done on our cloud gaming service
Please ensure your latency to our network is acceptable — games that upload with too much stuttering or too many artifacts will be rejected
After uploading
Once the video has been uploaded, please contact tech support and provide the link to the video — and don't forget to include your VMID: support.maximumsettings.com
Maximumsettings will use its sole discretion to approve or reject videos for the 5 hourly credits.
The VMs page of the Maximizer Host web UI lets you create Windows or Linux virtual machines with full GPU passthrough — no command line required. Only Step 1 (installing/updating the Maximizer Host package) is done in console mode; everything after that is done from your browser and the Maximizer client. The same steps apply to Windows and Linux; OS-specific notes are called out where they differ.
Before you start: you will need an installation ISO for the OS you want (e.g. a Windows 10/11 ISO from Microsoft, or an Ubuntu ISO) saved on the computer you're browsing from, and enough free disk space on the host — check the Storage section at the bottom of the VMs page.
Step 1 — Install the new Maximizer Host and reboot (console mode)
The VM feature requires the latest Maximizer Host package (v1.0.248 or newer) installed on the bare-metal system itself. This step must be done in console mode — using the WebUI console feature in your online control panel, not during a streaming session — because the installer restarts the streaming service and a reboot of the host is required afterwards.
Install it — you can simply double-click the .deb in the console and use the graphical installer, no terminal required. (If you prefer the terminal, run sudo apt install ./Maximizer-Host*.deb.) Either way, KVM, QEMU, libvirt and Virt-Manager are pulled in automatically as package dependencies — nothing else to install.
Shut the host down:
sudo shutdown now
Then wait 6 minutes and power the host back on.
Once the host is back up, start in Gaming mode — from Step 2 onward everything is done there (streamed from the Maximizer client); the rest of this guide is just the host's web UI and the Maximizer client.
Step 2 — Check system readiness
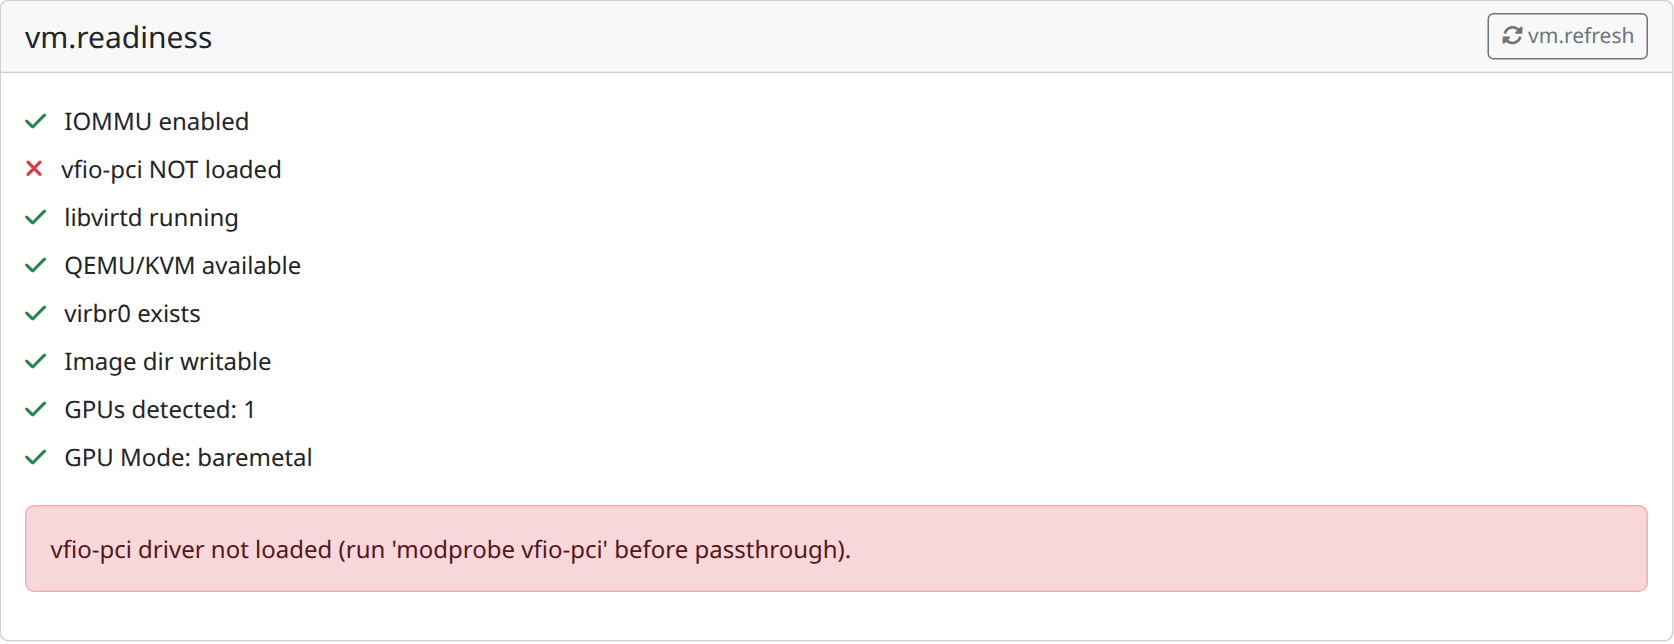
From here on, everything is done from your browser at https://<your-host-ip>:47990/vms — log in with your host's web UI username and password. Open the VMs page and scroll to the Readiness section. The key checks should be green: IOMMU enabled, libvirtd running, QEMU/KVM available, the virbr0 network bridge present, the image directory writable, plus OVMF (UEFI firmware) and vTPM available (added in v1.0.244). It's normal for vfio-pci to show as not loaded while the GPU is in Bare Metal mode — the driver is bound automatically when a VM starts (see Step 8).
No manual GPU switching: you don't need to touch the GPU Mode section during installation — it's informational only. The Maximizer client switches the GPU to passthrough for you automatically when you start the VM (Step 8). Just remember that starting the VM hands the graphics card to it, which ends any active bare-metal streaming session immediately.
Step 3 — Upload the installation ISO
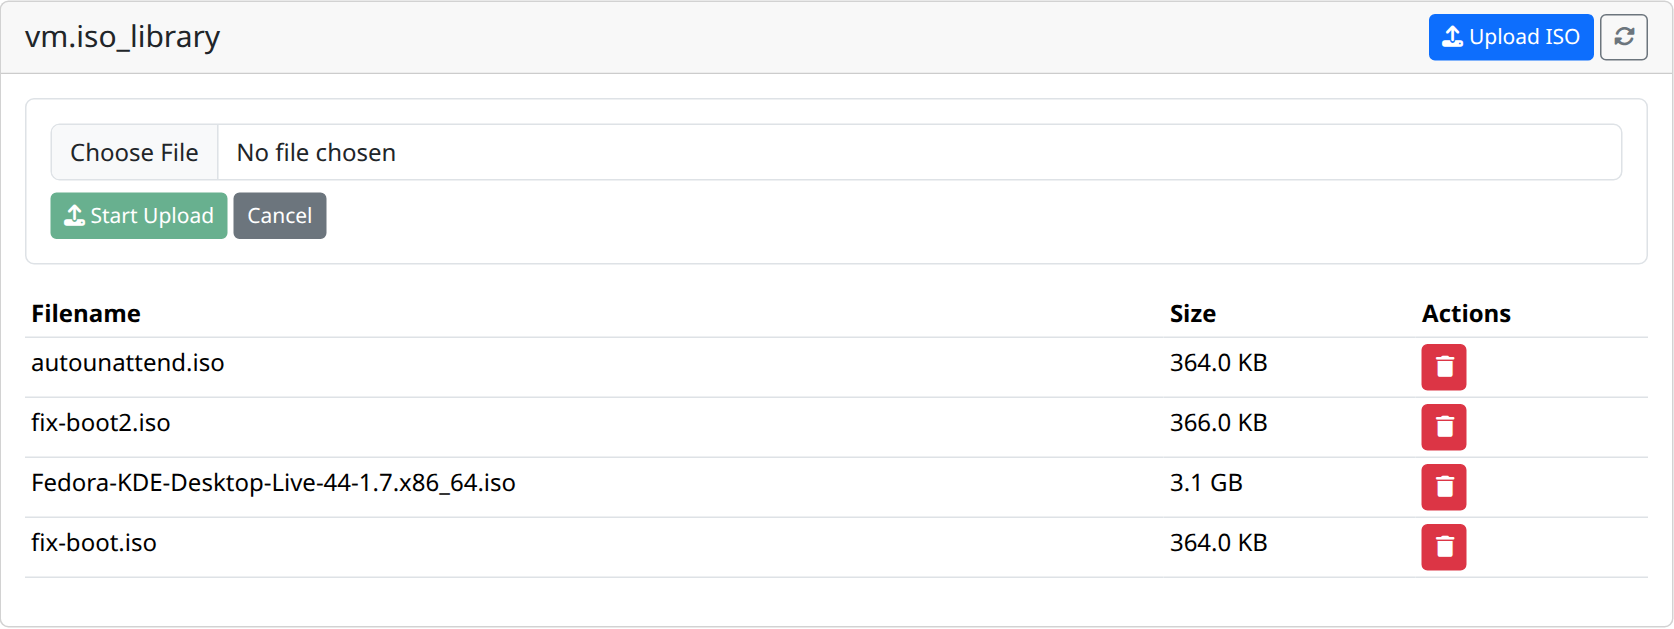
In the ISO Library section, click Upload ISO, choose your .iso (or .img) file and click Start Upload. Wait for the progress bar to reach 100% — large ISOs can take a while. The file then appears in the library table.
Step 4 — Create the VM
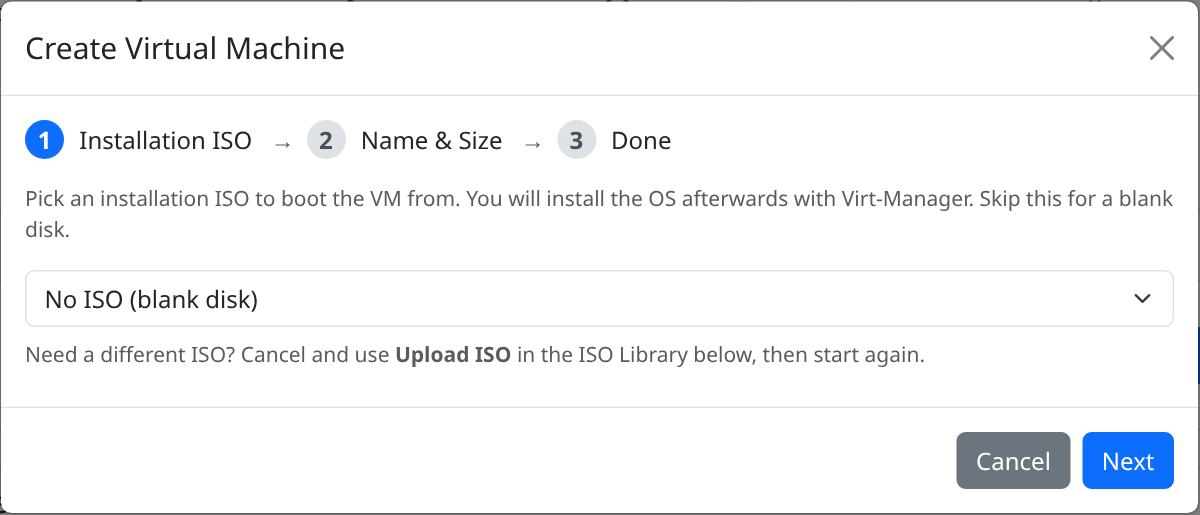
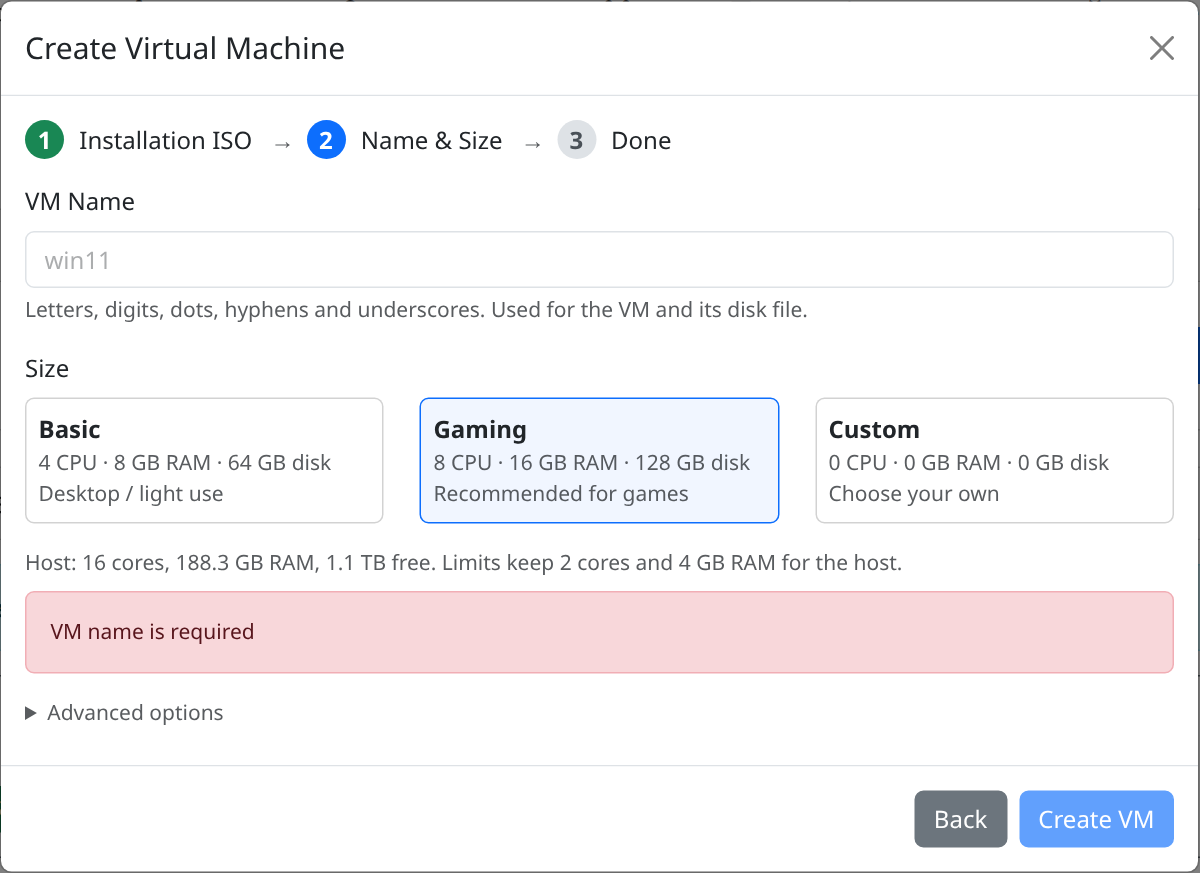
Click Create VM in the Virtual Machines section. The wizard has three steps:
Installation ISO — select the ISO you just uploaded (or choose No ISO for a blank disk) and click Next.
Name & Size — enter a VM name (letters, digits, dots, hyphens and underscores; it is also used for the disk file) and pick a size: Basic (4 CPU · 8 GB RAM · 64 GB disk) for desktop/light use, Gaming (8 CPU · 16 GB RAM · 128 GB disk, recommended for games), or Custom. The wizard enforces limits so the host always keeps enough CPU cores and RAM for itself. Under Advanced options you can enable auto-restore of a clean snapshot before each start — leave this off for a normal install, since it discards all changes made inside the VM. You can also turn off Secure Boot there (host package v1.0.248 and newer): leave it on for Windows and for most Linux distros — Ubuntu, Fedora and other mainstream ISOs boot fine with it — and turn it off only for niche Linux ISOs with unsigned bootloaders. Secure Boot cannot be changed after the VM is created.
Done — click Create VM. The VM is created and started automatically, and the wizard shows a one-time trust token for this VM. Keep it as a fallback — registration is automatic (Step 7), so you only need the token if a VM somehow doesn't register on its own. (If you close the wizard, you can generate a new token later in the Guest Pairing section.)
Note: host package v1.0.244 and newer creates VMs with UEFI firmware (OVMF) and a virtual TPM 2.0; v1.0.247 and newer adds Secure Boot (Microsoft keys enrolled) — Windows 11-ready out of the box, and UEFI is required for hosts with the Radeon AI PRO R9700 (RDNA4), whose VBIOS only works in UEFI mode. VMs created by older host packages used legacy SeaBIOS boot; on an R9700 host those must be recreated (or converted with MBR2GPT) before the GPU will produce video.
Step 5 — Open the console and install the OS
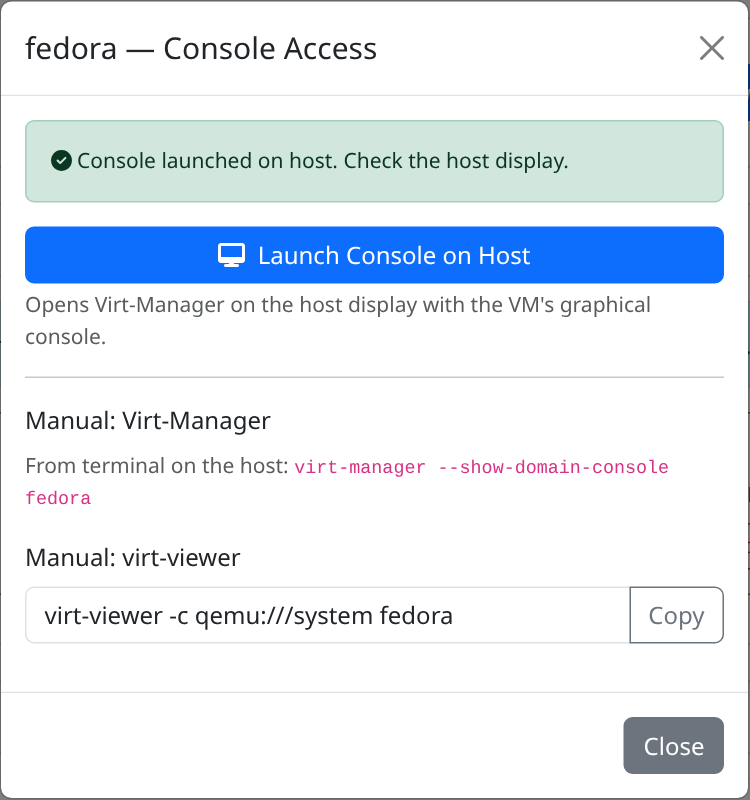
The new VM now appears in the Virtual Machines list with status running, booting from your ISO. Click Console next to it (or Open Console in the wizard's Done step) and then Launch Console on Host — this opens the VM's graphical console in Virt-Manager on the host display.
Windows: walk through the Windows setup as usual. The virtual disk uses a standard SATA controller, so the installer sees it without any extra drivers.
Linux: run through your distro's installer (e.g. Ubuntu's) and install to the virtual disk.
Advanced users can also connect from a terminal on the host with virt-manager --connect qemu:///system --show-domain-console <vm-name> or virt-viewer -c qemu:///system <vm-name>, or via VNC at the address shown in the console dialog (VNC listens on the host's localhost only — connect from the host itself or through an SSH tunnel).
Step 6 — Install Maximizer Sunshine inside the VM
Once the OS is installed and you're at its desktop, install the streaming software inside the guest:
Linux: install the Maximizer Host package for your distro.
Then restart the VM (Start Menu → Power → Restart) so the Sunshine service and the display driver come up cleanly. The host discovers the guest automatically within about 30 seconds of it booting. (The guest's Sunshine Web UI is pre-configured with the default username admin and password admin — you can change these later from its Web UI inside the VM.)
Step 7 — Register the guest with the host (automatic)
Good news first: no pairing is needed for the VM to show up. As long as your Maximizer client is paired with the bare-metal host, every VM you create appears in the client's app list automatically as soon as it's created.
Registration is fully automatic: once Maximizer Sunshine is installed and running inside the VM (Step 6), the host detects it on the VM network within about 30 seconds and registers it — no tokens, no manual steps. This works for fresh installs from a standard Windows or Linux ISO as well as prebuilt images, and it also re-runs automatically after every host reboot or update.
Fallback (only if a VM somehow doesn't register): open the Sunshine web UI inside the VM and enter Host IP192.168.122.1 (the VM's default gateway), port47990, and a trust token from the Guest Pairing section on the host's VMs page (click Generate New Token).
Step 8 — Start the VM from the Maximizer client
Prerequisite: make sure you have the latest version of the Maximizer client (v1.0.243) installed on your device — VM start and the automatic GPU switch are only available in the new build. Download it for your device:
Note: only the Linux version of the Maximizer client supports WebGPU.
Here's the convenient part: you never need to switch the GPU mode yourself. When you start the VM from the Maximizer client, it automatically switches the GPU to passthrough mode for you — no restart needed: the graphics card is handed to the VM live (your bare-metal session ends and the host's display goes dark), the VM boots, and you're connected within a couple of minutes. The full power-cycle with a ~6-minute GPU hardware reset is only needed when switching back to bare-metal gaming later — the client guides you through that too.
Heads up: starting the VM ends any active bare-metal streaming session, since the graphics card is handed to the VM. Finish anything you're doing on the bare-metal host first, then start the VM. While the GPU is in passthrough mode, the GPU Mode section of the VMs page shows Passthrough (vfio-pci) and bare-metal streaming is paused.
To go back to bare-metal gaming later, just launch a regular host app from the Maximizer client — it switches the GPU back to Bare Metal (amdgpu) automatically through the same guided restart.
Step 9 — Install the GPU driver inside the VM (Windows)
The first time the VM starts with GPU passthrough, Windows detects the graphics card as a Microsoft Basic Display Adapter — that's expected: the card is fully passed through, but Windows doesn't have its driver yet. Inside the streamed session, download and install the AMD Adrenalin drivers for your GPU from amd.com/en/support. The installer detects the card normally, since the passed-through GPU appears as a real device inside the VM. (The Maximizer installer already set up the Virtual Display Driver, which provides the streamed desktop; the AMD driver is what renders games and hardware-encodes the video stream.)
Tip: use the full "AMD Software: Adrenalin Edition" package from your GPU's support page (the large ~800 MB download), not the small web installer: the full package skips the VM-incompatible chipset stage on its own and installs the display driver in one pass. If you do use the small web installer and it appears to sit at ~64%, that's the optional AMD Chipset Software (not needed in a VM) — guest package v1.0.242+ clears it automatically, or end Chipset.exe in Task Manager; the display driver install then continues. Restart the VM once after installing so the driver binds.
Linux guests: nothing to do — the open-source AMDGPU driver is built into the kernel and works with the passed-through GPU out of the box.
Managing your VMs
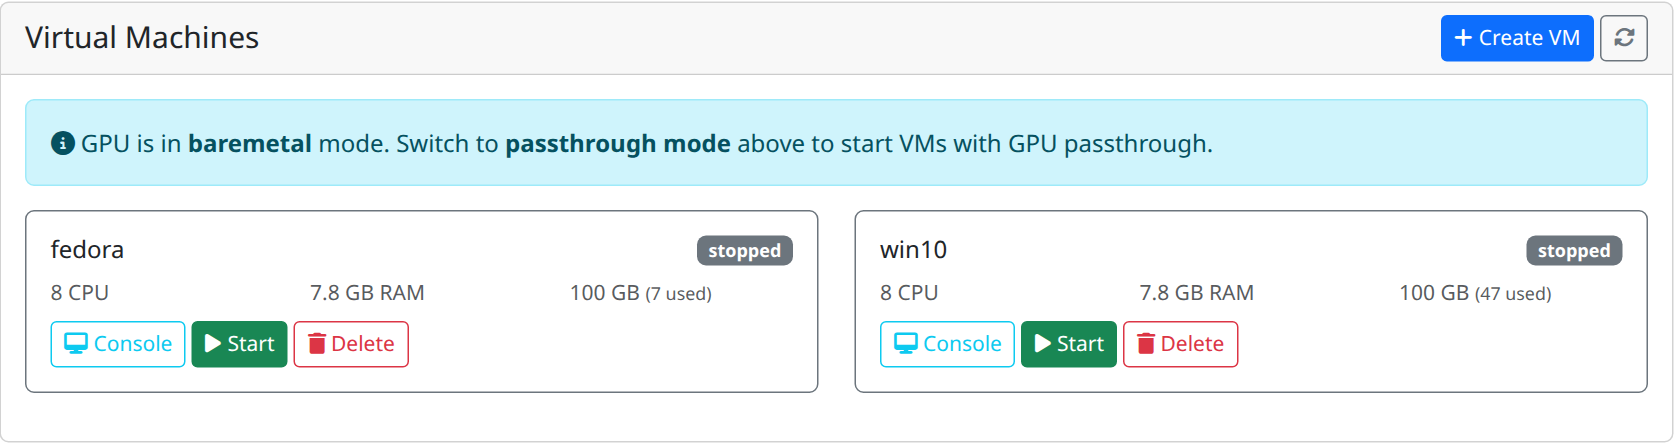
Each VM in the list has Start, Stop (graceful shutdown), Force Stop (power off) and Delete buttons. Deleting can optionally wipe the virtual disk — recommended, since it removes all data inside the VM. If you enabled the auto-restore snapshot option, every start rolls the VM back to its clean snapshot.
Troubleshooting
GPU needs a cold reboot — if Diagnostics reports the GPU is in an unrecoverable state, shut the host down completely (from inside the OS if you can, otherwise from your online control panel), wait the full 6 minutes for the GPU to discharge, then power it back on. The GPU returns to normal on the next boot.
VM created but not started — start it manually from the VM list with the Start button.
vfio-pci not loaded in Readiness — normal while the GPU is in Bare Metal mode; the driver is bound automatically when you start the VM from the Maximizer client.
VM has no network/IP — make sure the virbr0 readiness check is green; VMs get their network from that bridge.
Windows VM is booted but the client says the VM is "not running or unreachable" — the VM is running, but the streaming service inside it isn't answering. On host packages from v1.0.236 the guest configures itself automatically; on older installs, Sunshine stays in first-run mode and listens on localhost only until you open its Web UI inside the VM (https://localhost:47990) and set a username and password. Also make sure the host is on v1.0.233 or newer, which discovers guests automatically within about 30 seconds.
Error 409 ("GPU is not available/assigned") — the VM is running, but the GPU wasn't given to it. The GPU is only passed through when the VM is started from the Maximizer client. Stop the VM, then start it from the client — no host restart is needed; the card is handed over live.
Error 503 ("VM is not running or unreachable") right after starting the VM — the VM's OS is still booting and its Sunshine hasn't registered with the host yet. The VM can show as "started" before it's actually streamable; wait 1–2 minutes and try again (about 30 seconds on v1.0.233+).
VM shows in the client but won't connect right after a host reboot or update — the host rediscovers the VM's Sunshine automatically within about 30 seconds (v1.0.233+); just wait a moment and refresh the app list. If it still won't connect after a minute, stop and start the VM again.
GPU shows as "Microsoft Basic Display Adapter" in the VM — normal on the first passthrough start; install the AMD drivers (Step 9). If no AMD card appears in Device Manager at all, or it shows an error such as Code 43, stop the VM, shut the host down completely (a cold boot — not a restart), and start the VM again; the GPU ROM used for passthrough is captured once at host boot.
AMD driver installer appears stuck around 64% inside the VM — that pause is the optional AMD Chipset Software package: it checks for a physical AMD chipset motherboard, which a VM does not have, so its sub-installer just sits there. It does not block the graphics driver. Guest packages v1.0.242 and newer handle this automatically (the in-guest Maximizer service skips the chipset stage and ends any stuck Chipset.exe for you). On an older guest package: open Task Manager inside the VM (Ctrl+Shift+Esc → Details), end Chipset.exe, and the installer continues. Either way, restart the VM once afterwards so the driver binds; the streaming service then picks up hardware video encoding automatically.
"No video received from host" when streaming a VM — the handshake works but no picture arrives. Fixed in host package v1.0.243 and newer: the host now validates the GPU's VBIOS image it captures at boot (a rare corrupt capture made the guest detect the wrong card — e.g. an "AI PRO R9700" on a 7900 XTX host — and broke video). On older hosts: reboot the host (the VBIOS is recaptured at boot) and start the VM again. On a Radeon AI PRO R9700 host there is a second cause with the same symptom: the R9700 VBIOS is UEFI-only, so VMs created by host packages older than v1.0.244 (legacy SeaBIOS boot) never initialize the card — update the host package and recreate the VM.
GPU Mode shows "unknown" — the GPU driver was not detected; reboot the host.
Linux ISO stops on a blue "Security Violation" / "Secure Boot forbids booting" screen — the ISO's bootloader isn't signed for Secure Boot. Recreate the VM and turn off Secure Boot under Advanced options in the Create VM wizard (host package v1.0.248 and newer). For most Linux distros — Ubuntu, Fedora and other mainstream ISOs — leave Secure Boot on; they boot fine with it. Windows VMs should always keep it on (Windows 11 requires it).
The Customer recognizes and accepts that the present terms and conditions may be modified by Maximumsettings Inc. at any time in accordance with provision herein and any changes will be posted on Maximumsettings Inc. along with the effective date (2023-11-22).
Who we are
Our website address is: https://maximumsettings.com
Content
Transmission, storage, or presentation of any information, data or material in violation of any Canadian Federal, Provincial or City law is prohibited. This includes, but is not limited to: copyrighted material, material we judge to be threatening or obscene, or material protected by trade secret and other statute. The subscriber agrees to indemnify and hold harmless Maximumsettings Inc. from any claims resulting from the use of the service which damages the subscriber and any other party.
Spamming
Spamming, or sending of unsolicited e-mail, from any of our servers or using an e-mail address or domain that is maintained on our server machine as reference is strictly prohibited. Maximumsettings Inc. will be the sole arbiter as to what constitutes a violation of this provision.
Backups
We suggest that you backup your gaming system as often as you see fit just in case there is some sort of corruption in our servers and we cannot retrieve the information properly. Maximumsettings Inc. will not be responsible for any loss data.
Refusal of Service and Termination
We reserve the right to refuse, cancel, or suspend service at our sole discretion. We may also terminate your account if you fail to start or login to your account for a period of 2 months.
Cancellations / Recurring Billing & Refunds
Recurring Billing: Membership will not automatically renew. You are required to opt-in before activating this feature. If opted-in, all credit cards are billed automatically on their renewal dates. If you do not want to renew your account please cancel the account on or before the renewal date. Cancellations must be done through the online support panel https://support.maximumsettings.com/. Please make sure you obtain the cancellation ID or ticket number for your request to confirm cancellation of service.
Non Payment: It is the client's responsibility to ensure that they have sufficient credit to cover this transaction. In the event that there is insufficient credit, as a courtesy we will send an e-mail notification at which point we will need to be provided with another credit card within 48 hours.
Account Deactivation: Any account deactivated due to non-payment must contact the billing department to reactivate it. We cannot guarantee that your account will be activated or that the data will be fully intact for overdue accounts.
In accordance with the approach to cancellation and termination described above, Maximumsettings Inc. will refund prepaid Service fees based on the number of days left in the last monthly billing cycle after your cancellation date.
Hourly credits will be refunded for the remaining credits that have not been used. No refunds will be issued for used credits. Please note that trial credits and free bonus credits are non-transferable and have no cash value. If you have any questions about your credits or the refund policy, please contact our customer support team.
Limitation of Liability and Indemnification
Maximumsettings Inc. will not be liable for any delay or failure to provide the Service, at any time or from time to time, or any interruption or degradation of voice, video or data quality. The aggregate liability of Maximumsettings Inc. to The Customer or any third party for direct damages arising out of or in connection with this Agreement shall be limited to the lesser of: (a) the actual direct damages suffered by the Customer, and (b) the charges paid by The Customer during the previous calendar month. IN NO EVENT WILL Maximumsettings Inc., ITS AFFILIATES AND THEIR RESPECTIVE OFFICERS, DIRECTORS, EMPLOYEES, OR AGENTS BE LIABLE FOR, AND THE CUSTOMER HEREBY WAIVES THE RIGHT TO CLAIM, ANY INCIDENTAL, INDIRECT, SPECIAL, PUNITIVE, EXEMPLARY, COMPENSATORY OR CONSEQUENTIAL DAMAGES, OR FOR ANY OTHER DAMAGES, INCLUDING BUT NOT LIMITED TO PERSONAL INJURY, WRONGFUL DEATH, PROPERTY DAMAGE, LOSS OF DATA, LOSS OF REVENUE OR PROFITS, OR DAMAGES ARISING OUT OF OR IN CONNECTION WITH THE USE OR INABILITY TO USE THE SERVICE, INCLUDING INABILITY TO ACCESS EMERGENCY SERVICE PERSONNEL THROUGH THE Maximumsettings Inc. 911 SERVICE OR TO OBTAIN EMERGENCY HELP. THE LIMITATIONS SET FORTH HEREIN APPLY TO CLAIMS FOUNDED IN BREACH OF CONTRACT, BREACH OF WARRANTY OR CONDITION, PRODUCT LIABILITY, TORT (INCLUDING NEGLIGENCE), INTELLECTUAL PROPERTY INFRINGEMENT, STRICT LIABILITY, AND ANY AND ALL OTHER THEORIES OF LIABILITY AND APPLY WHETHER OR NOT Maximumsettings Inc. WAS INFORMED OF THE LIKELIHOOD OF ANY PARTICULAR TYPE OF DAMAGES.
Force Majeure
Notwithstanding any other provisions, Maximumsettings Inc. shall not be liable for failure or interruption of its services if due to causes or events beyond its reasonable control.
THE CUSTOMER ACKNOWLEDGES AND SOLELY ACCEPTS THE RISKS ASSOCIATED WITH ANY ONLINE ACTIVITY. THIS INCLUDES, BUT IS NOT LIMITED TO, THE RISKS OF MALWARE, VIRUSES, DATA LOSS, DATA THEFT – INCLUDING PERSONAL AND PRIVATE INFORMATION, CONNECTION FAILURE OR NETWORK OUTAGES. THE CUSTOMER SHOULD SEEK PROFESSIONAL ADVICE BEFORE RELYING ON USE OF THE SERVICE FOR MEDICAL OR SECURITY PURPOSES.
Prohibited activities
Any unauthorized modification, interfering or tampering with the equipment, wiring, telecommunication facilities including, but not limited to, demarcation points, or unauthorized use of telecommunications in general, is prohibited and may constitute theft of telecommunication service under the Criminal Code of Canada.
Maximumsettings is provided to the Customer for personal, residential, non-commercial use ONLY.
Selling any of the services or utilizing them for purposes other than personal use is prohibited. In addition, you agree not to provide Internet access or any other service feature to third parties using the services.
Furthermore, the customer is responsible for ensuring that their activities do not hinder, disrupt, inhibit, degrade, or impede Maximumsettings capability to provide services and monitor the services, backbone, network nodes, and/or other network services.
Mining activities of any kind are also not allowed on Maximumsettings Inc. Gaming PC accounts. This includes both data mining and cryptocurrency mining.
Fair Use Policy
This Fair Use Policy applies to Maximumsettings Gaming PC's. Usage plans and services with flat rates or hourly access are contingent upon customers using the service within a typical range and in a manner that doesn't excessively strain network capacity or adversely impact Maximumsettings ability to serve other users. For instance, Maximumsettings considers the following activities to be beyond a normal range of use and indicative of excessive network capacity consumption:
Prolonged and continuous use of high-bandwidth applications like multimedia streaming, voice over Internet protocol, or location-based services (LBS). Operating (hosting) servers for email, web, news, video, chat, Crypto Mining, or similar services. Reselling, transferring, or distributing the service for commercial purposes. Sharing with a third party. Engaging in or permitting any alteration, copying, reproduction, or tampering with electronic serial numbers or other identification, signaling, or transmission functions or components of the device used with the service. Maximumsettings reserves the right to immediately suspend, restrict, modify, or terminate all or part of any service provided to a customer or take other necessary protective measures if it determines, reasonably, that a customer is violating this policy.
Violation of this Agreement
Use of the Service in a manner which Maximumsettings Inc., in its sole discretion, believes violates this Agreement, may result in Maximumsettings Inc. taking any responsive actions it deems appropriate. Such actions may include, but are not limited to, temporary or permanent removal of hosted content, messages or data; and the immediate limitation, suspension or termination of all or any portion of The Service. Maximumsettings Inc. shall not have any liability for any such responsive actions.
The above described actions are not the exclusive remedies of Maximumsettings Inc. and Maximumsettings Inc. may take any other legal or technical action it deems appropriate.
Maximumsettings Inc. reserves the right to investigate suspected violations of this Agreement, including the gathering and examination of information from The Customer or Customers and the complaining party, if any. During such an investigation, Maximumsettings Inc. may suspend The Service(s) involved.
No Waiver
The failure of Maximumsettings Inc. to enforce this Agreement, for whatever reason, shall not be construed as a waiver of any right to do so at any time.
Account Activation
By activating your account with Maximumsettings Inc., you agree to the above policies and disclaimer. Upon requesting an account activation, you are required to accept these policies, guidelines, and disclaimer and a copy of your acceptance is forwarded along with your activation request to be maintained within your account information.
Notice: If you sign up for an account and do not follow our terms, no refunds will be given. We will however let you know by e-mail or phone before any action is taken place and you will have a chance to solve the matter.
Furthermore: Maximumsettings Inc. retains the right to change any or all of the above Policies, Guidelines, and Disclaimers without notification.
Contact
terms@Maximumsettings.com
Maximumsettings Inc. Unit 6, 11 Steinway Blvd, Etobicoke, Ontario, M9W 6S9 Canada
Who we are
Our website address is: https://maximumsettings.com.
Commitment to your privacy
Maximumsetting's Privacy Policy is organized along ten privacy principles, which are:
Accountability
Identifying Purposes
Consent
Limiting Collection
Limiting Use, Disclosure and Retention
Accuracy
Safeguards
Openness
Individual Access
Challenging Compliance
Because we gather certain types of information about our members, we feel you should fully understand our policy and the terms and conditions surrounding the capture and use of that information. This privacy statement discloses what information we gather and how we use it.
Information Maximumsetting's gathers and tracks
Maximumsetting's gathers two types of information about users:
Information that users provide through optional, voluntary submissions. These are voluntary submissions to receive our electronic newsletters, to participate in our message boards or forums, to email a friend, and from participation in polls and surveys or to order any service.
Information Maximumsetting's gathers through aggregated tracking information derived mainly by tallying page views throughout our sites. Under no circumstances does Maximumsetting's divulge any information about an individual user to a third party except to its sister companies Qrnetwork's Inc / Canaca (High Speed Internet Provider & Web Hosting).
1. Electronic newsletters policy (Dispatches)
We will offer a free electronic newsletter to users. Maximumsetting's gathers the email addresses of users who voluntarily subscribe to our service.
2. Message boards/forums policy
Users of the site's Message Boards and Forums must register separately for these services (both are free of charge) in order to post messages, although they needn't register to visit the site. During registration the user is required to supply a username, password, and email address.
3. "E-mail this to a friend" policy
Our site users can choose to electronically forward a link, page, or documents to someone else by clicking "e-mail this to a friend". The user must provide their email address, as well as that of the recipient. This information is used only in the case of transmission errors and, of course, to let the recipient know who sent the email. The information is not used for any other purpose.
4. Polling
We may offer interactive polls to users so they can easily share their opinions with other users and see what our audience thinks about important issues. Opinions or other responses to polls are aggregated and are not identifiable to any particular user. Maximumsetting's may use a system to "tag" users after they have voted, so they can vote only once on a particular question. This tag is not correlated with information about individual users.
5. Surveys
Maximumsetting's may occasionally conduct user surveys to better target our services to our audience. We sometimes share the aggregated demographic information in these surveys with Canaca-com Inc. and QRnetworks, our sister companies. We never share any of this information about specific individuals with any other third party.
Usage tracking
Maximumsetting's tracks user traffic patterns throughout all of our sites. However, we do not correlate this information with data about individual users. Maximumsetting's does break down overall usage statistics according to a user's domain name, browser type, and MIME type by reading this information from the browser string (information contained in every user's browser).
Maximumsetting's sometimes tracks and catalogs the search terms that users enter in our Search function, but this tracking is never associated with individual users. We use tracking information to determine which areas of our sites users like and don't like based on traffic to those areas. We do not track what individual users read, but rather how well each page performs overall. This helps us continue to build a better service for you.
Cookies
We may place a text file called a "cookie" in the browser files of your computer. The cookie itself does not contain Personal Information although it will enable us to relate your use of this site to information that you have specifically and knowingly provided. But the only personal information a cookie can contain is information you supply yourself. A cookie can't read data off your hard disk or read cookie files created by other sites. Maximumsetting's uses cookies to track user traffic patterns (as described above). Our advertising system delivers a one-time cookie to better track ad impressions and click rates.
You can refuse cookies by turning them off in your browser. If you've set your browser to warn you before accepting cookies, you will receive the warning message with each cookie. You do not need to have cookies turned on to use this site. However, you do need cookies to participate actively in message boards, forums, polling and surveys.
Use of information
Maximumsetting's uses any information voluntarily given by our users to enhance their experience with our service, whether to provide interactive or personalized elements on the sites or to better prepare future services.
As stated above, we use information that users voluntarily provide in order to send out electronic newsletters and to enable users to participate in polls, surveys, message boards, and forums. We send out newsletters to subscribers on a regular schedule (depending on the newsletter), and occasionally send out special editions when we think subscribers might be particularly interested in something we are doing. Maximumsetting's never shares newsletter mailing lists with any third parties, including advertisers, sponsors or partners except with Canaca-com Inc. & QRnetworks.
We use tracking information to determine which areas of our sites users like and don't like based on traffic to those areas. We do not track what individual users read, but rather how well each page performs overall. This helps us continue to build a better service for you. We track search terms entered in Search function as one of many measures of what interests our users. But we don't track which terms a particular user enters.
Security
Maximumsetting's operates secure data networks protected by industry standard firewall and password protection systems. Our security and privacy policies are periodically reviewed and enhanced as necessary and only authorized individuals have access to the information provided by our customers.
Your consent
By using this site, you consent to the collection and use of this information by Maximumsetting's. If we decide to change our privacy policy, we will post those changes on this page so that you are always aware of what information we collect, how we use it, and under what circumstances we disclose it.
For more information
If you have questions or concerns about your privacy, you can contact us by email or snail mail at:
privacy@Maximumsettings.com
Maximumsettings Inc. Unit 6, 11 Steinway Blvd, Etobicoke, Ontario, M9W 6S9 Canada

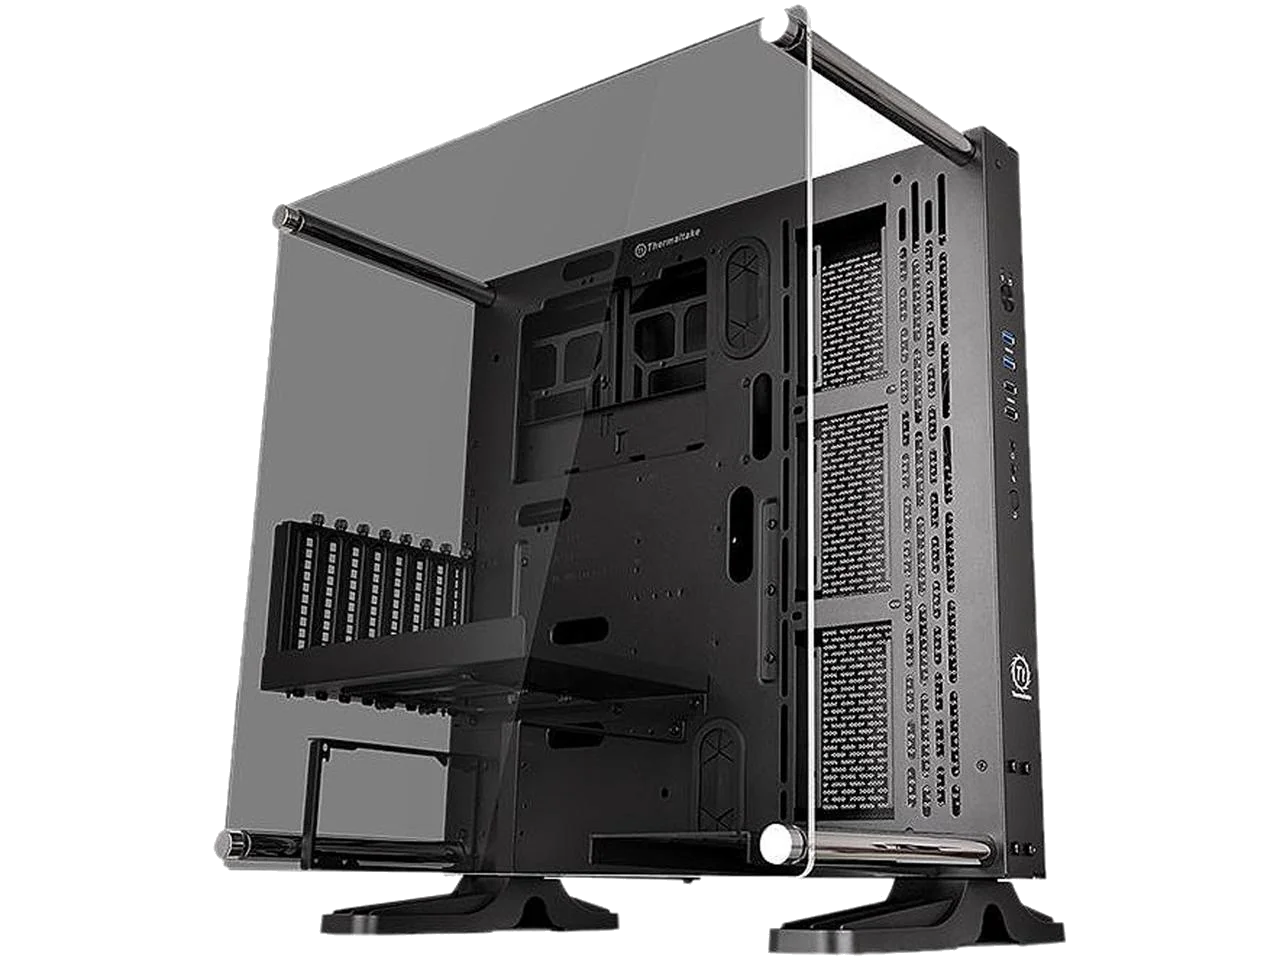 Thermaltake open case
 RX 7900 XTX
 G.SKILL Trident Z5 DDR5
 Ryzen 9 7800X3D / 7900X3D
 EVGA power